Browsing Category

Lunches & Light Suppers

Autumn/ Courses/ Lunches & Light Suppers/ Spring/ Suppers, Dinners & Main Courses/ Winter

A SPRING RECIPE FOR PORK

Pork chops with apple and creme frâiche

As you know I am someone who tries to eat seasonally and reasonably locally, although I am not going to apologise for buying avocados or olive oil. Traditionally, pork has not been much of a spring meat, which I think is a shame as while the weather remains unpredictable during March and April, I think free range organic pork is a splendid choice.

Our local butcher recently had beautiful pork chops, with a fair layer of flavour – adding fat so I snaffled a couple. Once home, however, I then had the “what do I do with them” problem. Pork chops have flavour at the more delicate end of the range and frankly, can also be dry, if not cooked carefully. For that reason, I am not a fan of the plain grilled pork chop, so I consulted better cooks than I to decide how to get the best from them.

I have a quite a fair size cookery book collection which is something of a double edged sword when it comes to consulting them, as it can take so long to look through them. There is also the serious risk of becoming completely engrossed in a book I haven’t opened for a while and losing sight of my original need to look in the book in the first place! Anyway, my fingers hovered around Richard Olney’s three books that I have in the collection and I realised that I really haven’t paid him as much attention recently as I should have done.

For those of you who don’t know him, please may I take a moment to commend his writing to you, especially if you are partial to good wine, or at least reading about it. He was an American who, like many before him, fell in love with France and its attitude to food and wine. He lived in Paris during the 50s and 60s and writes evocatively about the arts scene of the time. He eventually settled permanently in Provence where he wrote most of his books. My favourite is “Reflexions” in which he is deliciously gossipy about many food names from the second half of the twentieth century. I no longer feel quite the same about Julia Childs but did have my view of Elizabeth David positively reinforced.

I found the inspiration I was looking for in Mr Olney’s “Simple French Food” and whilst I didn’t follow the recipe to the letter, I did like the method and most of all, the outcome. This is my take on the Olney recipe and I am very grateful for everything I have learned from reading his books.

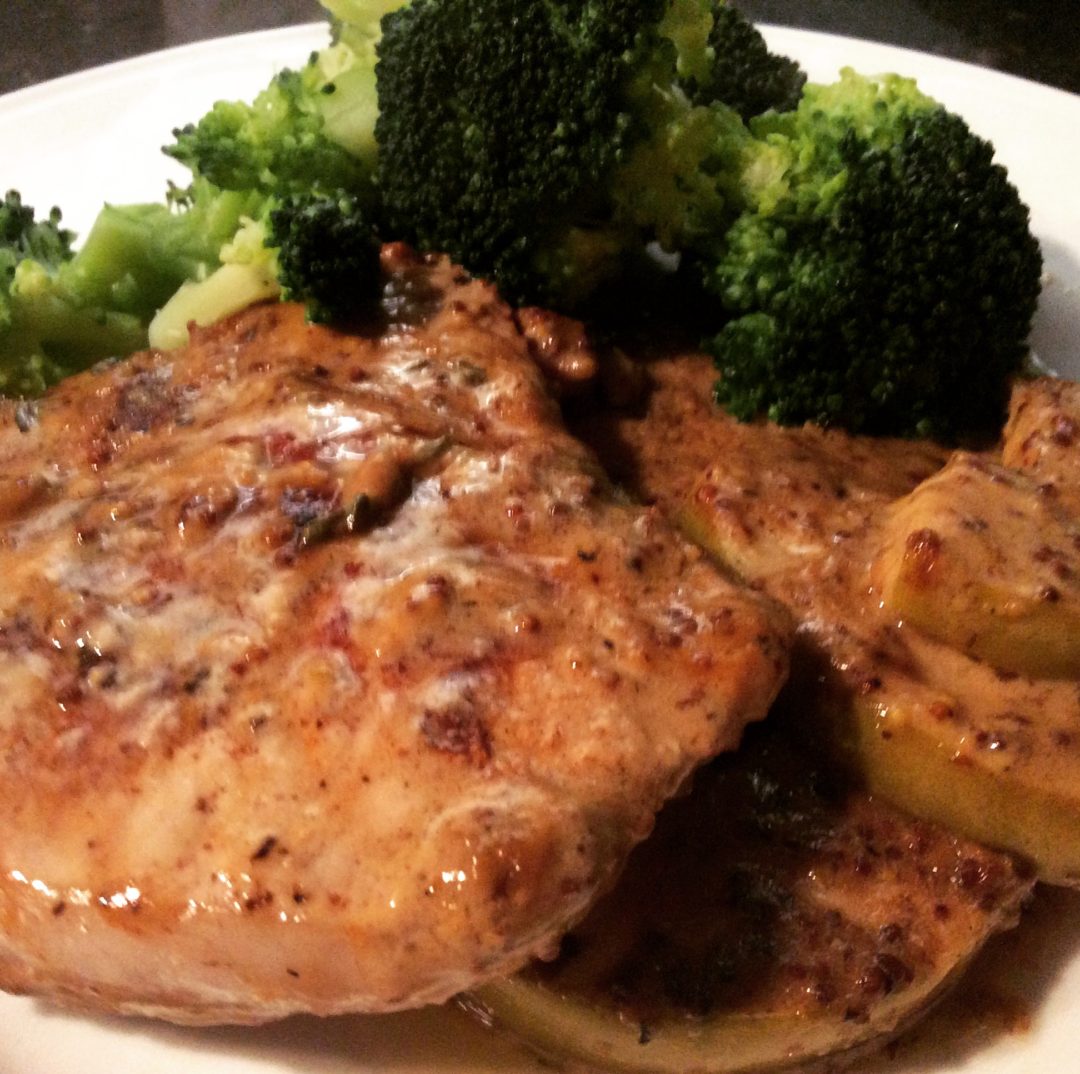
PORK CHOPS WITH APPLE AND MUSTARD CREAM

Print Recipe
Serves: 2 Cooking Time: 45 inc prep

Ingredients

  • 500g eating apples, preferably with a bit of tartness to them and a crisp texture
  • 1 tbsp unsalted butter, plus more for greasing
  • 2 free range organic pork chops, skin removed if present
  • sea salt
  • 150ml dry white wine (I used a Gavi of which I doubt Mr Olney would approve as he didn’t seem to be a fan of Italian wine)
  • 4tbsp creme frâiche
  • 4tbsp Dijon mustard
  • black pepper
  • A well buttered gratin dish or other shallow oven proof dish, into which the chops will fit without overcrowding or distortion

Instructions

1

Take the chops out of the fridge about half an hour before you start cooking

2

Pre heat the oven to 180C fan

3

Peel, core and quarter the apples, slicing the resulting pieces into thin slices and lay them in the dish, turning them over so they acquire some of the butter clinging to the dish

4

Place the dish in the oven and bake for 15 minutes

5

While that’s going on, over a medium heat melt the tablespoon of butter in a sauté pan and brown the chops, about 7 - 8 minutes per side

6

Remove the apple from the oven (leave the oven on) and put the chops on top, leaving the sauté pan on a low heat

7

Add the wine to the pan, scraping any meaty scraps from the base and sides of the pan

8

Turn up the heat a little so that the wine bubbles enthusiastically and reduce it by about half

9

Turn down the heat to low and add the creme frâiche, stirring it all in

10

Add the mustard, tasting you go to your satisfaction; you may like more or less than the amount I’ve suggested

11

Season with salt and pepper and pour the sauce over the chops and apples

12

Give the dish a good shake to ensure the sauce penetrates down to the apple

13

Return the dish to the oven and leave it there, unmolested for 15 minutes; if you have particularly thick chops, you may need a few minutes more

Notes

It’s very easy to multiply this up to feed more than two people and is equally good with wholegrain mustard. I have also tried adding a small amount of chopped sage or thyme, but decided I preferred the simplicity of the basic recipe. I like to serve this with brown rice and a green vegetable, or good bread and a green salad. Drink the wine you’ve got left from making this dish!

Courses/ Lunches & Light Suppers/ Seasons/ Suppers, Dinners & Main Courses/ Winter

A WINTER CARB FEST

Winter carb fest - gattò di patate

There is something about the cold winter months that makes carbohydrates much more attractive during that time. I do try to limit them as there is no doubt that for me, too many induce lethargy. Add to that limited sunlight, cold wet weather and a warm snuggly bed and I have a recipe for staying too long in bed, weight gain and low mood. It makes perfect sense then for me to conserve my carbs for those I really love, usually rice or good pasta. Yes, I love bread but trial and error has proven to me that too much really does not agree with me; one or two slices per day of good sourdough is my limit.

With an Irish surname like mine, you’d think I’d love a potato but actually I can take them or leave them. Cue grandfather spinning in grave…

Recently however, I have been using potato a whole lot more and it’s all the fault of Angela Clutton and Borough Market Cook Book Club. Our January event was an homage to the late, great Antonio Carluccio and I was a bit slow off the mark bidding to make his Caponata, which I love. I therefore chose something that is also a family recipe, which in itself is a bit of a mystery and I’ll come to that later.

Having had Caponata nabbed from under my nose (you know who you are), I went for Gattò di Patate, which has nothing to do with cats (spot the accent!) and everything to do with a wonderful combination of potatoes, cheese, egg and cured meat. I ask, you in this weather, could you imagine anything more wonderful and tempting?

Gattò in this context is a corruption of gâteau and dates back to when Naples was a Napoleonic possession (although because this is Italy, there are other opinions!) and that is where the family mystery comes in. As you know, we are an Anglo Italian household and everyone on the Italian side comes from either Carrara in Tuscany, or Borgo val di Taro in Emilia Romagna, so how a Neapolitan recipe comes to be in the family repertoire is a complete mystery. Perhaps someone visited Naples and fell for this complete carb fest and brought the recipe back north. In truth I’ve avoided making it until now, not being much of a potato lover, despite plaintive hints from Edoardo from time to time.

Now, however, its time had come. Comparing the Carluccio recipe with the family one revealed some interesting differences (again, perfectly normal in Italy) but I played by the rules for the Cook Book Club and made the recipe in the Carluccio Collection. That version mixes the meat and cheese components throughout the dish and it was tasty but now having made the family version, to me that is the more delectable version, and is the one I’ve described below.

You’ll see that I have listed specific cured meat here but in truth, the meat component can be leftovers or good bacon, anything that will cut into nice little matchsticks. If you are buying something specifically for this dish, don’t buy anything that will disintegrate under the cooking conditions, for example thinly sliced Mortadella will disintegrate (although if you buy a chunk of it and cube it, that will be OK).

The potatoes are important – they must be a floury variety so for example Alouette, Maris Piper, Desirée or even good old King Edward. The cheese (apart from the Parmesan) must be a type that melts easily such as Taleggio, Provolone, Scamorza, Mozzarella or Fontal. In the picture I have used Montasio which is a DOP cow’s milk cheese from Friuli and the Veneto but I accept this can be tricky to get hold of in the UK.

This is quite a rustic carb fest and although it is frequently served as an accompaniment with a roast meat or fish, we have enjoyed it most as a supper dish in its own right with a clean, fresh green salad (my favourite here is Little Gem, rocket and fennel in a sharp lemony dressing).

Do try it now, before spring arrives and this will be too carby – it has converted me to the humble spud!

GATTÒ DI PATATE

Print Recipe
Serves: 4 - 6 Cooking Time: 30 minutes

Ingredients

  • 1kg floury potatoes, scrubbed but left whole
  • 50g unsalted butter plus extra for greasing
  • 6 tbsp dried breadcrumbs
  • 4 medium eggs, beaten
  • 3 tbsp finely chopped parsley
  • 75g grated Parmesan, Gran Padano or Pecorino Sardo
  • 150g cured meat eg salami, speck, prosciutto or mortadella (buy in a piece and cut into slim pieces, like slightly thicker matchsticks; if you use speck, I like to lightly fry it first)
  • 150g cheese that melts well, eg Taleggio, Provolone, Scamoza, Mozzarella, Fontal, Montasio, sliced
  • olive oil or butter to finish
  • sea salt and freshly milled black pepper
  • a 25cm springform cake tin or ovenproof dish, well buttered and coated with about 4tbsp of the breadcrumbs

Instructions

1

Pre heat the oven to 180C fanBoil the potatoes in their skins until soft when pierced with a skewer

2

Drain and allow to cool and dry off

3

Peel and then mash or use a ricer to produce a dry potato powder (I have seen a recipe that says sieve it but honestly, life is too short)

4

Add 50g butter and mix in well to achieve a smooth potato mash

5

Add the meat, parsley, 50g of the Parmesan or other grated cheese and then the eggs

6

Mix well until smooth and spread half on the base of the tin or dish

7

Layer the sliced cheese over the potato, cutting up the cheese to ensure every bit of the potato is covered with cheese

8

Cover with the other half of the potato mix and press down quite firmly

9

Sprinkle with the remaining grated cheese and breadcrumbs and either drizzle with a little olive oil or dot with butter

10

Place in the centre of the oven for about 30 minutes until golden brown; if it hasn’t taken colour by 25 minutes, ramp it up 10 degrees for the last five minutes

11

Serve warm or cold with a refreshing green salad with a lemony dressing

Notes

If you’ve used a springform tin, it looks good turned out onto a pretty plate to serve I have also then used a small biscuit cutter to create bite sized pieces to use as stuzzichini, perhaps topped with a parsley leaf


Courses/ Lunches & Light Suppers/ Seasons/ Suppers, Dinners & Main Courses/ Winter

A DISRUPTIVE VEGETABLE

I’d been thinking for a while that I might have got into a bit of rut with my cooking, so while preparing my farmdrop.com order, I decided to disrupt my vegetables choices and opt instead for a veg bag from lovely Purton House organics. My thinking was that if I’m faced with a bag full of fab veg, I will be forced (or do I mean encouraged?) into new thinking and approaches.

Anyway, this week the bag contained Jerusalem artichokes, which I have always loved when I’ve eaten in Italy or France, but never cooked in the UK. The first idea that came into my mind was soup; I love the whole process of soup making, there is something very reassuring and comforting about both making and eating it. I know, that doesn’t push me very far outside my cooking comfort zone but we are having a cold snap here in London, so soup is just the ticket.

You probably know that Jerusalem artichokes have absolutely nothing to do with Jerusalem, the word being a corruption of the Italian for sunflower: girasole. The two plants are related, both being of the genus helianthus. The artichokes can romp away up to 3m high if left unchecked and do look pretty if a bit straggly, when growing. The tubers do look somewhat unpromising and learn from my experience: try to get the least knobbly ones, otherwise after peeling them, you can be left with precious little to use.

It is thought that the plant originally came from North America via the French explorer Samuel de Champlain (he who founded Quebec and charted the first maps of the Canadian east coast). The plant was first cultivate though, by the Dutch botanist Petrus Handius in the seventeenth century. They proliferated across Europe to the point that in 1629, the British botanist John Parkinson declared them to be so common and cheap “that even the most vulgar begin to despise them”.

Delicious though they are, they do have an unfortunate reputation for disrupting the digestive system although I think Gerard’s Herbal of 1621 was a tad extreme in saying “which way so ever they be dressed and eaten, they stir and cause a filthy, loathsome, stinking wind within the body, thereby causing the belly to be pained and tormented, and a meat more fit for swine than men”.

Personally I’ve never found this to be the case but perhaps that is because our diet is already quite rich in beans, pulses and vegetables. I also find that pairing the artichokes with a full fat dairy product (butter, cream, cheese or yogurt) minimises the disruptive effect.

If I haven’t completely put you off trying these, bear in mind they are a rich source of potassium and iron and also contain useful quantities of niacin, thiamine, phosphorous and copper so give this delicious soup a go and be generous with finishing it with cream or creme frâiche!

JERUSALEM ARTICHOKE SOUP

Print Recipe
Serves: 4 Cooking Time: 30 - 40 mins

Ingredients

  • 25g unsalted butter
  • 1 tbsp olive oil (doesn’t need to be virgin but should have a mild flavour)
  • 1 large onion, peeled and chopped
  • 3 celery stalks, chopped (make sure you run a potato peeler down the stalks if they are “mature”, to rid them of those pesky strings)
  • 2 medium potatoes, peeled and diced
  • 250 - 300g unpeeled weight Jerusalem artichokes, peeled and diced
  • a few sprigs of thyme
  • 1 litre hot vegetable stock ( a low salt powder or cube is fine)
  • 250 ml cold whole organic milk (don’t even think of doing this with skimmed milk)
  • sea salt and freshly ground black pepper

Instructions

1

Take a heavy bottomed pan and melt the butter over a low to medium heat then add the oil to minimise the risk of the butter burning

2

When the butter is foaming but not coloured, add the onion and celery and soften them for five minutes or so

3

Do not allow this soup to colour at any stage as it will spoil the creamy white purity of the end product

4

Add the potato and Jerusalem artichoke and cook for another five minutes

5

Strip the leaves off the thyme sprigs and add to the mixture in the pan

6

Add the hot stock, followed by the milk

7

Stir well and leave to simmer gently for 30 - 40 minutes; keep a sharp eye on proceedings as you don’t want any colour, or for the milk to cause a boil over

8

When the artichoke and potato are easily crushed against the side of the pan, switch off the heat and allow the soup to cool slightly

9

Use a stick blender to create a smooth creamy soup, season and serve in warm bowls

Notes

Finish with cream or creme frâiche and chopped parsley to create a colour contrast In the picture I have finished with three rehydrated dried Morels, fresh double cream and a drizzle of truffle oil. Pink peppercorns make a pretty contrast, perhaps with a spoonful of Greek yoghurt.

Books & Blogs/ Courses/ Lunches & Light Suppers/ Spring/ Summer/ Suppers, Dinners & Main Courses/ Tips & Techniques

A HANDY TART FOR THE SUMMER…WHAT SUMMER?

Onion and Thyme tart

In this less than summery weather we are having, I always think things like quiches and tarts are useful to have in your repertoire. If it’s cold and grey (as per London as I write this) they can be eaten with new potatoes and a vegetable and if (by some miracle), we have sun and warmth, you can make them early in the day while it’s cool and eat them at room temperature with salad. I was extolling their virtues amongst a group of friends recently and I was a bit taken aback when one said, somewhat accusingly, “well I suppose you’re bl**** WonderWoman and always make your own pastry”. Ha, if only….no, I don’t.

It isn’t my favourite kitchen activity and if I didn’t have a Magimix, I am not sure I would ever make pastry. I nearly always have some ready made pastry tucked away in the freezer and my favourite is the French brand Marie La Pâte Feuilletée Ready Rolled Puff Pastry (no, I am not being paid to mention this). Rather conveniently the ready rolled round perfectly fits a 24cm flan tin so given that I nearly always have the other ingredients to hand for a tart or quiche, this cuts out the (for me) tedious part of the recipe. I’ll be honest and say that I used this by mistake the first time – I overlooked the fact that it was puff pastry but now I actually prefer it for this recipe.

This recipe owes its genesis to Sybil Kapoor’s Onion Tart in her book ‘Simply Veg” published by Pavilion (and I urge you to buy it – fabulous recipes that always work). As is my habit, however, I have tweaked and experimented – not least by using puff pastry – to make something that fits our personal tastes and sometimes, just uses what I have. This version is, however, the one we prefer and appears regularly, warm or cold. It puffs up massively while cooking and then when cold, sinks back to something that almost looks slightly disappointing. Do ignore this little failing, as the flavour is deeply savoury and rewarding; it also travels well for picnics or packed lunches.

I like to use a well flavoured olive oil for this as it is reflected in the final flavour and I have been getting good results recently with the Greek brand Charisma which even Edoardo admits is a very good oil. If the budget runs to it, the French Roscoff pink onions are superb in this recipe – their subtle flavour really shines through but use what you have or can source well.

If you want to use shortcrust pastry, please do – and if you want to make your own, well that’s good too!

ONION AND THYME TART

Print Recipe
Serves: 6 Cooking Time: 45 minutes

Ingredients

  • 1 packet Marie La Pâte Feuilletée Ready Rolled Puff Pastry or 170g shortcrust or puff pastry
  • 60ml extra virgin olive oil
  • 2 large or 3 medium onions, peeled and thinly sliced
  • 2 cloves garlic, crushed to a paste with sea salt salt under the blade of a knife
  • 2 tbsp thyme leaves, stripped from the branches (yes, I know it’s a pain but it’s worth it)
  • salt and freshly ground black pepper
  • 2 medium eggs, well beaten
  • 200 ml creme frâiche or soured cream
  • 60g finely grated Parmesan cheese

Instructions

1

Preheat the oven to 180 degrees C fan and set a baking tray to heat

2

Line a 23/24cm flan tin with your chosen pastry

3

Prick the base and then line with baking parchment or greaseproof paper

4

Fill with baking beans and put on the heated baking tray to bake blind for 15 minutes

5

Remove the beans and paper and return to the oven for a further 5 - 7 minutes until the pastry is golden brown

6

While all this is going on in the oven, heat the oil in a non-stick frying pan over a low to medium heat

7

Add the onions and garlic and fry gently for about 20 minutes; some colour is fine but we’re not looking for a high degree of browning here which would impair the fresh flavour

8

Add the thyme leaves and stir around to distribute evenly amongst the onions and garlic

9

Remove from the heat and seasonTransfer to the pastry case, spreading them evenly

10

Add the creme frâiche or soured cream to the beaten eggs, season well with freshly ground black pepper and add to the onions in the pastry case

11

I don’t add salt here as the Parmesan gives enough for our tastes

12

Gently mix it into the onion mixture being careful not to pierce the pastry which your not - so -Watchful Cook has done on one occasion

13

Sprinkle with the cheese and return to the oven, on the baking tray, for 25 minutes until puffed up and golden brown

Notes

Eat this warm (but not hot) or cold with salt or vegetables, depending on the weather!

Courses/ In My Kitchen/ Lunches & Light Suppers/ Suppers, Dinners & Main Courses/ Techniques/ Uncategorized

CHICKEN À LA CHLORINE

You might reasonably expect this post to provide a couple of chicken recipes. No, sorry, no recipes. Instead I am talking about something that concerns me deeply and about which I am alternately enraged and anxious.

How does the idea of eating chlorine-washed chicken appeal to you? How do you like the idea of not being able to identify that the chicken you’re about to buy for Sunday lunch has been treated in that way? To immediately allay your fears, if you are presently buying said chicken in an EU country, you won’t be eating chicken à la chlorine.

Once the UK has left the EU and is possibly left without the protection of its highly developed Food Safety and Animal Welfare regulations, it is likely that a trade treaty will be entered into with the USA. For many items, that may well be good but food? Not so much. Animal Welfare and Food Safety Regulations in the USA are remarkably less protective than in the EU. That is good for neither man nor beast and my absolute number one concern is American – produced chicken.

I must state that United States Department of Agriculture organically reared and certified chicken is honourably excepted from the remarks below, as indeed are EU certified organic birds.

Chicken not produced under that certification are reared in sheds of up to 30,000 flocks from a few days old to the ripe old age of 42 days. The sheds are not cleaned during that time so the creatures live on increasing layers of ammonia which burns the animals and renders human breathing so compromised that it is almost impossible to enter the sheds safely. At 42 days they are either slaughtered for the food chain or ground up alive and made into fertiliser. During their short, miserable lives those creatures will have been routinely fed antibiotics and inorganic arsenic (this latter is NOT legal in the EU) in order to prevent disease and give the illusion of a healthy bird. They have also been pumped full of growth hormones to accelerate their development process and produce an anatomically deformed creature that has huge breasts and spindly little legs (any relation to Barbie dolls is unintentional), that disposition of flesh apparently being what the consumer wants.

At this point – if you are still with me – I must say that this equally applies to intensively reared chicken in the EU, too. Nothing in the paragraph above is illegal in the EU (except the inorganic arsenic part), shocking though those conditions are.

What is however, strictly outlawed in the EU and with good reason, is the washing in a chlorine solution of chickens. In the USA, once the bird is slaughtered and eviscerated, they are routinely washed in a chlorine solution approximating the concentration used in public swimming baths. This is alleged to diminish the risk of E.coli and Salmonella being present in the bird. Some processors shower the birds, others literally bathe them so the water is cross contaminated by being used for multiple birds, which release particles of blood and faeces into the bath. There is no reliable evidence that this process reduces the possibility of the consumer contracting either E.Coli or Salmonella. It is the rearing process which protects against that; chlorine bathing is shutting the henhouse door after the chicken has flown.

The UK’s Secretary of State for International Trade, Liam Fox MP has been quoted as saying that “Americans have been eating it safely for years”. Really? Is America a healthy country? I’m happy to leave you to make that judgement but my own experience of watchful cooks and consumers in the USA is that they only buy and eat organic chicken and eat it less frequently in order to balance their budgets. They avoid commercially processed food and only buy with full traceability. To not take these precautions exposes them to birds raised and chlorine treated as described above.

So this worrying situation may be coming to the UK sometime after 2019. Even worse, any repealing of Animal Welfare and Food Legislation originating in the EU could leave unscrupulous producers in the UK open to utilising chlorine washing as a so-called safety measure. So there is now every possibility that the quality of food in this country will diminish; industrial producers, who have the loudest voices, deepest pockets and the ear of the politicians will rub their hands in glee at the prospect of spending less on rearing and production, thus compromising animal welfare and – let’s not forget this – flavour.

Not only the chickens will suffer: we will too. I do not want antibiotics that aren’t prescribed by my GP, nor do I want to support a hellish industrial process that plays on my conscience. I am happy to eat less chicken but pay more for an organically reared bird. I am happy to buy a whole bird and use all of it, right down to the bones. The more of us that do the, the smaller the market for the industrialists and bigger the opportunities for organic farmers.

I for one, have no intention of chicken à la chlorine with a side order of inorganic arsenic being on my table any time soon.

Lunches & Light Suppers/ Spring/ Summer/ Suppers, Dinners & Main Courses

WHAT A SAUCE!

Sorrel hollandaise with asparagus

Why is it that certain recipes induce fear into the most intrepid cook’s heart? I will admit to be being very cautious about anything involving deep fat frying, in the absence of having a dedicated piece of kit. I am not however, afraid of mayonnaise or any of the other so called “Mother Sauces”. In fact, I sometimes think my food would be a much duller if I didn’t use them fairly frequently.

This week was an absolute case in point as I was casting around for something slightly different to do with salmon and asparagus. I had fallen for some sorrel from Farmdrop.com as I love the lemony sharpness that is a good foil for richer, oilier produce. It seemed a good combination to me to make a sorrel Hollandaise with steamed Jersey Royals, roast salmon fillet and steamed asparagus. Simple, flavoursome and absolutely seasonal.

So don’t be afraid of making a Hollandaise which you can then use as a wonderful base for adding a little finesse to simple steamed or roast fish and boiled or steamed vegetables. In a trice you can turn it into Bearnaise, Maltaise, Choron, Moutarde or Mousseline. Yes it can split and you do need the right recipe which lays out the steps carefully. Carême’s recipe is quite intimidating, requiring as it does, the cook to have a quantity of Allemande sauce to hand and 1 tablespoon of chicken stock. You can bet Carême didn’t use a stock cube and just to give you an idea about Allemande, you have to have velouté to hand before you can even start that. Those of us without a brigade behind us need a simpler approach to producing a delicious flavoursome Hollandaise with the minimum of stress and fuss.

Before we start, I have found there to be three golden rules for Hollandaise:

  • use unsalted butter at room temperature; you can clarify it if it makes you happy but after doing it once, I have never bothered since. I do, however, tend to use French or Italian butter which for some reason gives a smoother result
  • use fresh free range, preferably organic eggs; the better the eggs the better the end result and they are the main influence on the colour of the sauce
  • watch the temperature of the emulsion very carefully; I make mine in a Pyrex bowl over a pan of simmering water, although I always remove it at some point and end up clutching it to my bosom to keep the sauce warm but not hot. I have a friend who is somewhat better endowed in the embonpoint department than I, and she makes her sauce in the fashion from the get go. I am completely in awe of The Guardian’s Felicity Cloake who makes her Hollandaise in a pan, direct on the hob. One day I’ll try that…maybe.

My method is based on that which I learned years ago from the Leith’s Cookery Bible, which for me was – and is still – an absolute godsend for acquiring or refreshing techniques. I have tweaked their basic recipe to land on something which I can make with my eyes closed and so far (touch wood) has never gone wrong.

Sorrel Hollandaise

Print Recipe
Serves: 2 - 4 depending on greediness Cooking Time: 20 minutes

Ingredients

  • 3 tbsp wine vinegar (don’t use balsamic - used it once by mistake. Horrid)
  • 6 - 8 peppercorns
  • 1 or 2 bay leaves
  • 1 tbsp water
  • 1 or 2 blades of mace (not 100% essential)
  • 2 egg yolks
  • salt
  • 110 g unsalted butter at room temperature
  • lemon juice
  • 100g sorrel, finely chopped

Instructions

1

Put the vinegar, peppercorns, bay leaves, water and mace if used, into a small saucepan and reduce to 1 tbsp of liquid

2

Strain into a cold bowl and if you want to use immediately, shove it in the freezer for about two minutes to chill it

3

Put the egg yolks, a pinch of salt and a hazelnut size piece of butter into a heatproof bowl and stir together with a wooden spoon

4

Add half a teaspoon of the reduction and place the bowl over a pan of barely simmering water

5

Do not let the water touch the bottom of the bowl

6

Stir over the heat until slightly thickened and then start to add nut sized pieces of butter, stirring each addition well

7

Watch that the water doesn’t boil, so be prepared to moderate the flame under the pan and if necessary, move the bowl off the pan

8

It can be helpful to have a tea towel to hand to either place the bowl on, or wrap the bowl in if you employ what my well endowed friend calls “the bosom technique”

9

Keep adding the butter, stirring well and ensuring that butter is properly absorbed into the emulsion

10

If it begins to look a bit “sweaty” (unpleasant image, I know, but it does describe the condition), add a tiny bit more reduction or a few drops of cold water

11

When all the butter is in, remove from any heat source and beat vigorously for one minute

12

I do all this mixing and beating by hand, with a wooden spoon, simply because that’s how I’ve always done it and it makes me feel (unwarrantedly) virtuous

13

Check the seasoning and add salt and lemon juice to taste

14

Stir in the chopped sorrel and keep warm until needed

15

At this point, I sometimes add a tablespoon of double cream to make it a lighter, more pouring consistency; this doesn’t quite make it into a mousseline, for which you add stiffly whipped double cream at half the volume of the Hollandaise

Notes

I have read all kinds of dire warnings about what happens if you let Hollandaise get cold, but I have found it perfectly even tempered if I keep it at room temperature and don’t refrigerate it. If you find it has thickened a little, just put the bowl over warm water again and let it come to in its own good time, with a little gentle encouragement from a wooden spoon. Without the sorrel, it is a good, basic Hollandaise perfect for this time of year with pretty much anything seasonal


Lunches & Light Suppers/ Spring/ Summer/ Suppers, Dinners & Main Courses

ASPARAGUS AGAIN

Frittata di asparagi

I have friends who remark upon the passing of the years by exclaiming how quickly Christmas comes around. Not me, as apart from the fact that I truly loathe turkey, there are more pleasurable milestones throughout the year. For me, the best is the arrival of English asparagus. There is nothing quite like the real English product and I confine my asparagus eating to the eight or so weeks of the year when it hits the markets. Yes, when I am in Italy, I love Italian asparagus and it has a subtly different flavour so the risotto, or whatever I’m making, are also subtly different, but again, I only use it in season. And no, I never use Peruvian or Mexican asparagus that seems to be available all year round. Why would I do that? Why would anyone do that – it just doesn’t have the same depth of flavour.

I do remember years ago (in the 1970s or early 80s I think), I tried a recipe for a quiche that used canned asparagus and evaporated milk. It was foul, what was I thinking; even the dog wouldn’t eat it and Labradors don’t turn up their noses at much. I recently was given a can of asparagus, prior to the season starting, because this well meaning person knew how much of “an asparagus nut” I was. Well, quite. A nut but not idiotic. And yes, it is still foul stuff, still a travesty of the fresh product but OK for my neighbour’s compost heap.

I’ve written elsewhere on this site about how to make real asparagus quiche, soup and risotto so this short post is about how to put together an authentic Italian frittata using asparagus. If you can make an omelette, forget what you know about omelettes. You do see writers who say that a frittata is an Italian omelette and it makes me livid. OK, they are both eggs but the methods are different, not to mention that an omelette is folded or rolled and a frittata is flat. An omelette is made rapidly, keeping the eggs moving and is over in the blink of an eye. I love Margaret Costa’s description in her Four Seasons Cookery Book of being tutored in the art of omelette making by Monsieur Laplanche, then chef des cuisines at the London Savoy; he had been taught as a commis to cook on the back ring of a gas cooker with the naked flame in front of the pan, under his wrist. Don’t try this at home, but it gives you an idea of how rapidly the eggs should be cooked for a French omelette.

So having said all that, for this recipe, forget it all (although I implore you to find a copy of Mrs Costa’s book – it is captivating) as a frittata is approached differently. It is slow cooked and to finish it, you can either flip it like a pancake or whip it under the grill for a brief moment. Because I use a heavy Le Creuset pan for this, I have proven to myself that my wrists are too feeble to flip a frittata so despite what my Italian friends do, I use the grill method, but you do have to watch it like a hawk. I am a massive fail as well when it comes to the “slide in onto a plate and flip it over” method which if you want to attempt, that is what You Tube is for. If it ends up on the floor, don’t blame me.

FRITTATE DI ASPARAGI

Print Recipe
Serves: 2 Cooking Time: 20 minutes

Ingredients

  • 200g fresh English asparagus (a bit more or less won’t matter too much)
  • 4 large eggs
  • 50g grated Parmesan cheese (no, supermarket “cheddar” won’t do)
  • 30g unsalted butter
  • salt and freshly milled black pepper
  • A heavy based frying pan: I use a Le Creuset with a top diameter of 20 cms

Instructions

1

Heat your grill

2

Trim the asparagus and cut into 1 - 1.5 cm pieces, keeping the tips whole

3

Rinse and blanche in boiling water for 2 minutes

4

Drain thoroughly, patting gently dry with lots of kitchen paper

5

Beat the eggs in a bowl (I use a large Pyrex jug) until whites and yolks are well blended

6

Add the asparagus, cheese, salt and pepper (about 5 twists of the mill)

7

Melt the butter in the frying pan, over a medium heat

8

When the butter foams but is not coloured, add the egg mixture

9

Turn the heat down as low as possible and let the mixture set and thicken

10

This might take up to about ten or twelve minutes but don’t wander off and read the paper; it needs a close eye kept to prevent browning

11

When the top is still runny but the very edges look set, whip it under a hot grill for about 30 seconds, but again watch it like a hawk: it must not brown

12

Loosen the frittata from the pan using a spatula and slide onto a warm plate

13

Cut into wedges and serve warm, not hot, with a green salad

Notes

The frittata in the picture is a bit less puffy than normal as I only had three eggs. Still tasted good, though. We like to sprinkle a bit more Parmesan over the cooked frittata and they also work cold and travel well for picnics or packed lunches. They can also be adapted to use whatever you have around; I like to use up the ends of whole salami or chorizo, finely sliced red pepper, left over griddled courgettes or small cubes of gorgonzola which melt wonderfully into the eggy mixture. Cold and cut into small cubes, frittate are excellent stuzzichini, too


Lunches & Light Suppers/ Spring

BEARS AND EMERALDS

Spinach, watercress & wild garlic soup

If you read many “foodie” blogs, you’ll see that foraging seems to be something you need to do, or you are just Not Keeping Up. Now, I love fresh food but I am not going to start foraging. “Pick your own mushrooms” they say. Really? REALLY? How do you know they aren’t toadstools? How do you know your foraged risotto al funghi won’t kill off your nearest and dearest? There is a huge risk differential between snaffling a few blackberries to add to an apple pie and deciding you are qualified to distinguish between a delicious mushroom and a fungus which at best, will give you a night to remember for all the wrong reasons. I love nettle risotto but my nearest green space is Brompton Cemetery and call me a wimp if you like, but somehow I just don’t fancy eating something picked in a Cemetery (and there is the small matter of it being illegal to take flora from there).

In Italy, they do things differently and many pharmacists are qualified to pronounce on your foraged fungus (no, not the kind on your feet, although they do that too). There are also helpful signs near popular foraging sites warning you of the toxic fungus to be avoided, although how do you know those signs are comprehensive? Just because something doesn’t appear on the sign doesn’t mean it’s safe. Oh, I know, I’m a wuss but blame 35+ years of working in insurance – risk assessment is an ingrained habit.

My aversion to foraging does not, however, mean I need to miss out on recipes containing ingredients traditionally thought of as foraged. The lovely folk at farmdrop.com have recently added a seasonal goodie which I just love: wild garlic. I am pretty well addicted to garlic in most forms and this has given me the seasonal opportunity to experiment with it and look into its history.

It amused me to see that its Latin name is allium ursinum due to it being a favourite of the European Brown Bear who, after emerging from hibernation, would dig it up and feed voraciously, as it grew  early in the spring. Bears, in all their variations, are by far and away my favourite animal so it’s another reason for me to have a soft spot for this plant. In the absence of being able to keep a bear at home, I’ll happily settle for a dog, preferably an Italian Greyhound…but I digress.

This garlic is widespread over Europe but its similarity to Lily of the Valley, which is toxic, has led to a few cases of death through people confusing the two. I’m not sure I understand why as the flower forms are completely different and what about the smell? Crush Lily of the Valley and you get a light, pleasant fragrance that reminds me of Diorella. Crush wild garlic and it’s a whole different fragrance, unused, as far as I know by M. Dior. Just reinforces my aversion to amateur foraging, though.

Wild garlic is seasonal between April and June in the UK, so do make the most of it. I chop it into butter for the ubiquitous garlic butter or to drizzle over roast cod or chicken. The leaves (which have a slightly milder flavour than the bulb) can be used in a salad or added to a leafy green vegetable. The pretty white flowers make a lovely garnish, a change from the nasturtium, but I think my new favourite is this soup. Spring weather can be so unpredictable that I never feel a hot soup is unwelcome around about now and last weekend, when the weather here DID change rapidly and in the wrong direction, this was especially welcome. My slightly fanciful name references the Latin name and also the startlingly intense green of the finished soup which begs finishing with the contrasting colour of cream or creme frâiche – or indeed the flowers.

[sp_recipe

Autumn/ Courses/ Lunches & Light Suppers/ Seasons/ Suppers, Dinners & Main Courses/ Winter

A FACE ONLY A MOTHER COULD LOVE

I have been, as they say, unavoidably absent from these pages for the last few weeks as the builders began the work on the London flat and I had forgotten how much a big refurb project can take over your life. And it’s not the big stuff like choosing the kitchen and the bathrooms; it’s the small stuff. I was sitting on the Tube, quietly trying to read Jay Rayner and listen to Bach (what a pair) and I happened to glance up at the advertising. Normally quite safe, as the habitués of that space seem to mostly be wifi providers I’ve never heard of and dodgy looking money transfer outfits. Not this time; now I was invited to consider how meaningless my life would be without electrical sockets that have built in USB ports….what? Genius. Straight on to the builder, who has the patience of a saint. So you see, I haven’t been safe from the damned project even on the Tube. and I am trying to find all kinds of displacement activity to avoid choosing new door furniture. And tiles. And timber flooring. And paint colours…..so talking about the ugly sister of the vegetable world is a delight.

A few weeks ago, I mentioned celery, the Cinderella of the veg world, so let me introduce you to the ugly sister: celeriac. Honestly, it has a face only a mother could love, but it is, in this country at least, the unsung heroine of the vegetable world. I was delighted a couple of weeks ago to receive in my farmdrop.com order a complete plant, as per the picture. This was completely unexpected as normally in the UK, one only gets a trimmed root, which while less startling than the complete plant, still looks a bit like a turnip with a hangover. There the resemblance ends.

Every bit of a complete plant can be used, although there is a fair bit of waste when one trims the root. If you’re lucky enough to own a compost heap, then that isn’t a problem but it is important to trim off every bit of hairy root and any yellowing stalks or leaves. The stalks aren’t really bold enough to use raw, as in cultivation, the energy has gone into creating the lovely big root, but they are fine for using in soups or risotto (excellent in the latter with a morsel of Gorgonzola). The leaves can be used as a herb, so again good in soups, stuffings, risotto and with lentils, quinoa or cous cous.

The root, which is really the focus of this piece, makes wonderful soup but one of my very favourite things to do is put a whole celeriac, cut into chunks, under a roast chicken, mixed with garlic and thyme. I also put a couple of chunks inside the cavity with thyme and half a lemon, salt and pepper. When the chicken is done, keep the bird warm and put the roasting tin with all the celeriac and garlic gunk over a low flame (if there is a lot of fat, just pour most of it off), mix it up with a wooden spoon (the celeriac and garlic will be very soft by now), gradually add as much white wine as will make a deeply savoury sauce and simmer for a few minutes stirring all the while. A few green peppercorns won’t come amiss and although I have tried it with a spoonful of creme fraiche, for me, that’s gilding the lily. This isn’t a sophisticated dish but is very satisfying and people who have eaten this have always asked for the “recipe”. I think, however, that it is so simple as to barely qualify as a recipe, so it’s here and not written up as a recipe proper.

I also love celeriac incorporated with potato mash, but it does retain more water than potato, so I always steam it if I’m going to mash it. It’s also great as part of a platter of roast root veg; in particular it seems to pair and contrast well with roast parsnip (another less than lovely looking vegetable). Above all, it is stupendous in soup and the recipe that follows is wonderful. I can claim no credit for this, as I discovered it in the staff canteen where I worked; the chef was so pleased to have someone ask for a recipe you’d have thought it was his birthday. I have tweaked it a bit to please our palates more and despite the slightly unlikely combination of ingredients, do please give it a go. I promise you, it’s fab.

Celeriac, Coconut and Chilli Soup

Print Recipe
Serves: 4 normal people or 2 greedy ones Cooking Time: about an hour

Ingredients

  • 2 tbsp butter
  • 900g of celeriac root, peeled and chopped roughly
  • 750ml chicken or vegetable stock
  • juice of a lime
  • 2.5cm piece of fresh ginger, peeled and grated
  • 1 tsp lemon or ordinary thyme leaves, chopped finely
  • 1 green chilli deseeded and chopped
  • small bunch of fresh coriander, separated into stalk and leaves
  • 250 ml full fat milk (if you insist on using semi or skimmed milk, make something else)
  • 75g creamed coconut
  • grated zest of the lime

Instructions

1

Heat the butter and add the celeriac, cover and cook gently for about 10 minutes but don’t allow it to brown

2

Add the stock, lime juice, ginger, (lemon) thyme , chopped chilli and coriander stems

3

Bring just to the boil, cover and simmer for about 30 minutes

4

Add the milk and simmer uncovered for about another 15 minutes; you’re looking for the liquid to reduce but never boil

5

Remove from the heat, add the creamed coconut

6

Use a stick blender until you have a smooth soup; flecked with green from the chilli and coriander stems

7

Season as you please and garnish with grated lime zest and chopped coriander leaves

Notes

If, like me, you’re not too keen on coriander as a herb (love the seeds), use flat leaf parsley instead. Also feel free to use a different chilli and in fact, I have made this with dried crushed chilli. Both of these changes will alter the flavour slightly, but of course, it is still a delicious, warming soup that is a bit different.


Autumn/ Courses/ Lunches & Light Suppers/ Suppers, Dinners & Main Courses/ Winter

CINDERELLA CELERY

I will come right out and say I love celery and its root, celeriac. Love them to bits and happily crunch away on both of them. But they have a bad reputation; the stalks seem forever associated with the deprivation of a rigid low calorie diets, and celeriac usually evokes a puzzled look and a comment about how ugly it is.

Wrong, just wrong. Good celery is a staple ingredient for soffritto in Italian cooking and mirepoix in the French canon but the critical word there was “good”. I am sorry to say that so much of what is sold in the UK comes from Spain and is weak, feeble and hollow. Honestly, I’ve had Spanish celery – and Israeli come to that – you could use as drinking straws. The stalks shouldn’t be hollow and yellowy, and a good head of celery will feel quite heavy for its size. Oh and smell fresh and very celery-ry.

It is true to say that there is both green and white celery, but don’t mistake pathetic yellowing specimens for the delicious blanched Fenland celery that can be had in the UK during November and December. This has a strong distinctive flavour and like asparagus, has a short season, so do make the most of it while we have it.

Green celery is available more widely but UK grown, flavourful celery seems mostly available September to April and I have it my fridge most weeks during that time, with an interregnum for the Fenland crop.

This unsung hero is just so useful; I put it in risotto, lentils, soups, quinoa, couscous, stews and casseroles, not to mention cutting short lengths, filling with Gorgonzola and dusting with paprika. I know it sounds a bit Abigail’s Party, but I love it! It also earns a place on a cheese board with grapes and figs, which frankly I prefer over biscuits after a meal. I also use the leaves chopped up as one would a herb, but go gently as the celery flavour is very concentrated here.

Anyway, the celery I had from https://thefoodassembly.com/en/assemblies/8012/products was just gorgeous and although a fair amount was eaten with the lovely Slipcote cheese, I had enough left for this lovely soup which has a distinctly celery flavour and is creamy in texture, without needing the addition of any dairy (although you can add it if you want to!).

Celery Soup

Print Recipe
Serves: 2 - 4 Cooking Time: 30 minutes

Ingredients

  • 1 tbsp butter
  • 2 tbsp mild olive oil
  • 1 medium onion, peeled and chopped into small dice
  • 1 small clove garlic, chopped finely
  • 2 small/1 medium potato, peeled and chopped into small dice
  • 150g celery stalks, chopped into slices about 0.5mm wide
  • 1 slim leek, washed, sliced in two lengthways, then sliced into slender half moons
  • leaves stripped from two sprigs of fresh thyme
  • 1 heaped tsp Marigold reduced salt bouillon
  • 1 litre hot water
  • salt and freshly milled black pepper

Instructions

1

Heat the butter and oil in a heavy based saucepan and add the onion and garlic

2

Allow to soften but not colour and add the remaining vegetables and thyme

3

Soften for about 15 minutes but do not allow to colour

4

Add the Marigold powder, mix in and then slowly add the water

5

Season and mix well, bringing to a simmer but don’t let it boil

6

Simmer gently with the lid askew for about 30 minutes until the vegetables are soft and can be easily squashed against the side of the pan

7

Cool slightly and use a stick blender to process until smooth; the addition of potato will give the soup a very smooth, almost creamy texture so you don’t have to add dairy to finish the soup

Notes

My favourite finish are garlic croutons and in the picture, you will see a small swirl of Jersey milk, but in truth, it was gilding the lily. This freezes well, but freeze minus any dairy you might want to use.