In my efforts to shop with a shorter supply chain and closer to the supplier, I have tried my local Food Assembly. This is a network of local organisations which allow local suppliers to deliver food to organised distribution points after you order on line. I used https://thefoodassembly.com/en/assemblies/8012/products Putney Food assembly. organised by the lovely Floriane and supplying amazing fresh food, bread, dairy and fruit. Oh and there’s jams, jellies and chutneys too, one particular jam coming from as close as a garden in Mortlake. Price wise, well, for the fruit and veg, frankly, no more expensive than a supermarket, but of greatly superior quality. The preserves were a little more expensive than the mid range brands, but in the same ball park as the higher end brands.
It was great fun picking up the order, as it was all set out in a room in a pub on the embankment in Putney, for collection between 6.30 and 8.30. Easy parking (although I went on the bus) and you can have a drink while it’s all happening (hence me going on the bus….). The quality of produce was superb – as if I’d picked it from my own garden (I wish) and the cheese I tried was wonderful. I am sorry to report that that evening we put away the whole 100g of Sussex Slipcote Soft Sheep Cheese with Garlic and Chives with celery and multi seed sourdough, both from the Assembly.
Although it is strictly speaking a bit early in the season, I had ordered celery which I love for not just its flavour, but also its versatility. The stems were a little on the slender side but the flavour was wonderful – a mile away from flaccid supermarket stalks. The new ingredient for me was Rainbow Chard; I’ve had it served in Italy and I do like the flavour but in the UK, have always been deterred from buying it by the price and by the fact that in the supermarket, it looks faded, dusty and ready for its bus pass. Anyway, this was positively juvenile in what I can only describe as a huge bouquet and squeaky fresh. Couldn’t wait to try it, so after having it using Nigel Slater’s gorgeous recipe for Chard with caramelised onions and sultanas (in Nigel Slater’s The Kitchen Diaries Volume III), I still had lots left.
I remembered that I’d had it in a quiche in Treviso about three years ago so had a rummage around for recipes. There wasn’t one that I liked the sound of in its entirety, so this is very much my own recipe, following fairly standard quiche principles which I have tweaked to satisfy my likes and if I’m honest, what I had in the fridge. My Rainbow Chard had brilliant gold and ruby stems which was criminal to chop up completely so I used eight of them as spokes around the quiche. Very attractive looking but will cook them for longer next time as they could have done with being a bit more tender. And when you strip the leaves form the stalks, do make sure you get rid of any nasty stringy bits.
When it comes to pastry, I prefer to use a richer shortcrust pastry, using butter and egg yolk with a small quantity of ice cold water as it always turns out very short and crisp. It is a tad more difficult to work but I find it do-able if it’s left to rest for at least an hour. I haven’t included the recipe here, as you probably have your own favourites but the quantity I used was from 170g of plain flour and 100g butter.
150g rainbow chard, well washed, leaves stripped from the stalks, keep the 6 - 8 nicest stalks for the centre, chop the rest into small dice and slice leaves into narrow strips
70g pancetta, chopped into 1cm dice
1 shallot, finely chopped
1 small clove of garlic, finely chopped
leaves stripped from two sprigs of fresh thyme
150ml creme frâiche
3 medium eggs
50g finely grated Parmesan cheese
23 cm loose bottomed flan tin
oven tray
Instructions
1
Pre-heat the oven to 200 degrees C/180 degrees fan and put in the tray to heat
2
Line the flan tin with the pastry and bake blind in usual way
3
Meanwhile, put the pancetta in a non stick sauté pan over a medium flame and cook until the fan runs and the pancetta has taken on colour
4
Remove from the rendered fat and drain on kitchen paper
5
Soften the shallot and garlic in the pancetta fat, adding a little mild olive oil if necessary
6
Ensure they are soft but not coloured and then remove and drain on kitchen paper
7
Add the chard stalks to the pan and allow to soften without colouring; the whole stalks will need longer so you might want to put then in first
8
While all this is going on, crack the eggs into a large jug and beat well, stir in the creme frâiche and mix well and follow with the finely grated Parmesan
9
Add the thyme leaves and season, remembering that both the pancetta and cheese will add salt
10
When they are softened, remove the chard stalks from the pan and drain
11
Add the sliced chard leaves to the pan and also allow to soften but not colour or frizzle - add a little more oil if necessary; remove and drain
12
Spread the onion, garlic, pancetta and chopped chard stalks and leaves over the baked pastry case
13
Pour over the egg mixture carefully and make a pinwheel pattern with the whole chard stalks
14
Place the tin on the oven tray and bake for 25 - 30 minutes until the filing is set and it is a lovely golden colour
15
Serve warm or cold with a green salad or vegetables
I am bit late posting part three of my Supermarket Siesta as we’ve got builders in. Not here, thank heavens, but I had forgotten how much time it takes to choose bathrooms, especially when there are two of you trying to make the decision. It is quite amazing how strongly one can feel about taps, or should I say mixers. It is a curiously British habit to have separate taps in the bathroom and frankly idiotic, although we did agree on that. Anyway, this is not the purpose of this blog but I do feel better having got that off my chest, thank you.
You’ll know by now that I’ve been taking a day from the weekend and comparing costs between shopping from a non-supermarket source and an on-line supermarket. So far, the previous two blogs have been in favour of the non-supermarket source, cost-wise, but to be honest, I have been waiting for this to end! It almost seems too good to be true so this weekend, especially because we were having cod, I was expecting this to be the week it ended. Cod is rightly now an expensive fish; cod stocks were abused for too long and we should have to pay a premium for this beautiful fish, not to mention the fact that trawler men face danger every time they set out to sea. It therefore makes perfect sense to me that its price is where it is.
Anyway, here is what Sunday looked like for us:
Breakfast
Jersey milk yogurt
Blueberries
Lunch
Piedmont peppers
Buffalo Mozzarella
Pagnotta Sourdough
Supper
Pan fried cod finished with beurre blanc
Sweet potatoes roasted with thyme and garlic
Cavallo nero finished with olive oil and nutmeg
Runner beans
We had been given gorgeous chocolate from guidogobino.it in Turin, so that was dessert. Too many, in truth…..although I will post about them another time, as their chocolate is out of this world, even for a non-sweet tooth person like me.
Anyway, bearing in mind ingredients like olive oil, thyme, anchovies, salt and pepper are for me, store cupboard ingredients so I haven’t included them, I was absolutely astonished this week by the price difference. I had to have my maths checked (that not being my strong point…) to ensure I’d got this right. All the ingredients came from lovely Farmdrop.com as with the builders etc, I just didn’t have the bandwidth to shop around or go to Borough Market. Which actually, kind of makes another point; if you’re time-poor, you don’t have to rely on a supermarket when there are other suppliers around who can deliver flavour, cost efficiency and ethical supply chains.
So, Sunday cost us £22.15 and had I sourced from the same on-line supermarket I have used for comparison so far, the bill would have been £30.68. That (I am reliably informed!) is a staggering 38% more expensive.
I guess if your budget isn’t an issue, then this is irrelevant for you but ethical supply chains are, I hope an issue for many of us and flavour and freshness are surely top of any cook’s list? Shopping more closely to the supplier gives much fresher ingredients and I have noticed a discernible difference in the flavour of the food I’m serving. I can assure you it isn’t because of any step-change in my cooking abilities and in fact, in may ways, I am preparing food more simply. I just don’t need to make my home cooking complicated when I am using such beautiful ingredients – life is better all round.
So, the recipe this week is something I mentioned a week or so ago – Piedmont Peppers – and we do eat it quite a lot this time of year as all the ingredients come together seasonally. You can make other times of the year but the ingredients won’t be seasonal, will have probably covered many food miles and this will be reflected in the flavour.
It works well with green salad and good bread as a light lunch and also as a starter. It is easy to multiply up to feed lots of people in a buffet, or to include as a table of anti pasti if you are serving Italian style.
I first cooked this many years ago, using Elizabeth David’s recipe but have been fortunate enough over the years, to see this cooked in Piedmont home kitchens, so have modified my way of doing things. This, however, is very much my way of doing this lovely dish but I encourage you to experiment to find you own favourite way.
Serves: 2 - 4 depending on how/when you serve Cooking Time: 45 minutes
Ingredients
2 red peppers (look for heavy, fleshy specimens with the stalks intact)
3 San Marzano tomatoes, skinned
4 anchovy fillets (make sure you rinse them well if you are using salted)
2 cloves garlic, sliced thinly
fresh basil leaves
extra virgin olive oil (I like Ligurian oil for this but if you prefer a more peppery oil, that's fine too)
freshly milled black pepper
an oven proof baking dish or baking tray with a lip
Instructions
1
Pre-heat the oven to 200 degrees c/180 fan
2
Slice the peppers lengthwise, trying to slice through the stalk and preserving it as part of the pepper
3
Remove all the seeds and white pith
4
Sit in the oven proof dish, propping them up against each other if you have any wobbly specimens
5
Pour a couple of teaspoons of oil and an anchovy fillet into each pepper
6
Add a few slices of garlic and a torn basil leaf to each pepper
7
Season with black pepper
8
Halve the tomatoes lengthwise and add to the peppers
9
We like a good amount of tomato, so cut them to make them fit, although you do not want chopped tomato
10
Pour over a little more oil to moisten the tomato and tuck in more basil if you can
11
Put in the oven for about 45 - 50 minutes, until the peppers are a little blackened round the edges and they look relaxed and wrinkly
12
Best served warm or at room temperature; too hot or too cold and the flavours are lost
13
There are squabbles in our house about who gets to mop up the lovely savoury juices and I would implore you not to waste them.
Notes
I have tried this with yellow peppers - nope, doesn't work. The full, red ripeness is needed for the flavour to be at its best. I have used yellow peppers but then altered the ingredients to include capers and black olives but then they are not Piedmont Peppers! Lovely, but not Piedmont Peppers as I was told in no uncertain terms when in Turin.
This is such a simple recipe, I am wary of actually posting it but a good friend said that she’d never thought of it, so why not?
I think this is something that you can throw together from things you mostly have in the house anyway, plus the fact that you can add all kinds of bits you might find lurking in the fridge. I recently used a few scraps of left over Parma ham; any small pieces of salami are also good but I am reluctant to use anything fishy as i just can’t imagine how it might test. Although it might be good with lovely Morecambe Bay shrimps?
Apologies too, for the dayglo cheese; I was using up a bit of left over Red Leicester and it does come up bright! Tasted good though and that’s what counts.
The idea for this blog came when I realised, after leaving my corporate life, how much food I was throwing away, if I had over-provisioned (that happened SO often). It was therefore a stark reminder of my old life when towards the end of last week I was faced with leeks, feta cheese, an astonishingly pretty striped aubergine, a couple of San Marzano tomatoes and the dregs of the carton of creme frâiche. A rummage in the dry goods drawer also revealed a sad, almost empty bag of pearl barley. This post therefore, is not quite episode 3 of Supermarket Siesta which follows later this week, but I felt did talk to the origin of this blog.
The weather had begun to feel more like autumn, although not yet cold enough to trigger my soup-making (although enough to make me feel like Kanga counting Roo’s vests). So what to make? When in doubt, consult Elizabeth David is my motto and after half an hour in her company, and an espresso, I had inspiration, although I have to say I made most of this up as I went along.
So here are two simple recipes that are quick, reasonably priced and can be dressed up and down to suit either a solo lunch or supper at home, or serve as starters or main courses. I have a number of vegetarian friends and these work well for them, although I’m still working with a limited repertoire for vegans. I don’t seem to be able to get past using eggs, cheese and butter; my fault I know and I probably need to find the time to do a whole lot more research.
I think the stuffed aubergines will be a regular through the autumn and winter and I’m looking forward to playing around with the flavours.
2 sprigs thyme, leaves stripped and chopped (I don’t always bother to chop as I don’t mind seeing the little leaves in the finished recipe)
0.25 tsp ground cumin
finely grated zest of half a lemon
1 dsp capers, rinsed and chopped
40 - 50 g feta cheese
2 tbsp dried breadcrumbs
Salt and freshly milled black pepper
A greased oven tray
Instructions
1
Pre heat the oven to 200 degrees C/180 degrees fan
2
Set the pearl barley to cook over a moderate flame until al dente then drain
3
Cut out the flesh of the aubergine, chopping it into 1cm dice. Leave a slim shell of aubergine skin and set aside.
4
I find an old grapefruit knife remarkably useful for this operation. Try your best not to pierce the shell as it will leak horribly.
5
Heat the oil in a thick based pan and soften the shallot and garlic, without letting them colour
6
Add the aubergine flesh and cumin and cook until the aubergine begins to soften
7
Add the tomato, thyme and barley and mix well
8
Allow to simmer until the mixture is quite dry - the tomato juices must evaporate to stop the mixture being sloppy and also to intensify the flavours
9
Add the grated lemon zest and capers and check the seasoning
10
Fill the two aubergine shells, packing the mixture quite firmly
11
Crumble over the feta cheese and finish with the breadcrumbs
12
Cook for 25 - 30 minutes until the stuffing is hot, cheese melting and the aubergine shells a bit wrinkly
Notes
I prefer to eat this warm rather than hot and like it with either a simple green salad or buttered savoy cabbage.
Feel free to experiment with the spices here; I can imagine cinnamon being good and to shake things in a different flavour direction, ground cardamom and/or fennel seeds. Just thought - dried porcini mushrooms, soaked and finely chopped could be good too.
Last week I started my response to the Supermarket Siesta challenge and I have to say, everything about it talks to my desire to move away from (my) mindless on line ordering or wandering in a supermarket. As I said also last week, I am not going to declare supermarkets instruments of the devil (although I can think of a couple of brands that do approach that status), but I am finding using farmdrop.com and Borough Market (to name but two), does make me plan meals better and think more clearly about the seasonality, balance, flavours and economy of what we’re eating.
Yes, it takes a bit of time a couple of times a week to do that planning but in truth, it’s time I look forward to, as it allows me to think about what’s seasonal and then rummage around, either in my food library (I’m going to write about that soon) or in my head, to find solutions. Sometimes I am beguiled by something so appealing when I’m shopping that I do click or buy and then think afterwards about what I’m going to make! On reflection though, that is exactly what I do when we’re in Italy, so interestingly, I am moving my UK habits closer to those I have in Italy.
Our menu for Sunday looked like this:
Breakfast
Jersey milk yogurt with blueberries
Sourdough toast with blackberry and gin jam
Lunch we had out, so doesn’t count here
Supper
Piedmont peppers (will write this up soon)
Salmon fillet wrapped in Parma ham with bay leaves (ditto!)
Chargrilled golden zucchini with lemon, fennel seed and basil dressing
Spiced apples (recipe elsewhere on this site) with creme fâiche
My bill for this lot from non-supermarket suppliers was £27.20 and the same on-line service that I used last week for comparison came to £34.91. I have not included store cupboard ingredients such as anchovies, fresh basil or garlic as I have those to hand all the time. If it’s not basil season, it will be thyme or rosemary, both of which obligingly supply the kitchen all year round.
The most remarkable price differentials came with the Sourdough bread (£3.20 versus £5.33 weight for weight), two organic red peppers (£2.00 versus £6.00) and the San Marzano tomatoes (£2.70 versus £3.99 by weight). I used lovely farmdrop.com for some items and others came from traders within Borough Market.
Also, I had made enough Piedmont Peppers and Chargrilled Zucchini for us to have them for lunch on Monday with bread and a bit of goat’s cheese.
Chargrilled Golden Zucchini with Lemon, Fennel Seed and Basil Dressing
500g golden zucchini, or indeed any fresh looking ones you can get
olive oil for brushing
1 clove garlic
100ml extra virgin olive oil
freshly squeezed juice of half a large lemon
quarter teaspoon of fennel seeds
fresh basil leaves
Instructions
1
If the zucchini are quite large, the skins can be a bit tough so just scrape a vegetable peeler down it to give a striped effect
2
Dispose of the stalk and slice into 2 - 3ml thick slices
3
You can either produce “coins” (hence the word “zucchini” in the first place), or on the diagonal, or even lengthways; do what pleases you
4
Brush them with olive oil but don’t soak them
5
Heat a griddle pan until hot but not smoking - you’re dealing with delicate zucchini here, not a chest-beating steak
6
Add a few slices at a time but don’t over-crowd the pan or you’ll start to get too much steam kicking up
7
Once each slice has nice clear stripes, turn them over; for me, they are then done when they have gone floppy and have good chargrilling marks on them
8
Remove to a platter and spoon over the dressing, building up the platter in layers as the zucchini become readyFor the dressing:
9
Crush the garlic with sea salt under the blade of a knife and put into a small bowl
10
Gently crush the fennel seeds, just enough to allow the fragrance to release more easily and add to the bowl
11
Pour in the extra virgin olive oil and whisk briskly
12
Add lemon juice to your taste; I quite like a lemony sharpness to counteract the smoothness of the grilled vegetable and we were having it with salmon which is a rich fish
13
Add freshly milled black pepper to taste
14
Once you have layered and dressed all your zucchini, finish with torn basil and a final flourish of oil
Notes
You can also include aubergines in with this and I do still salt and drain them first. Habit, I suppose, as we are told that modern varieties aren't bitter. Slice them a little thicker, say 3 - 4 ml, and they need a little longer on the griddle, too. Later in the autumn, I add a little ground cumin to the dressing, if I am using aubergine for a warm flavour. Finely chopped chilli also works well here in the dressing.
Well that was another miserable Spring Bank Holiday weekend; cloudy, cold and uninviting generally. Something had gone wrong with my quartermastering and I opened the fridge yesterday to unused fresh peas and fresh broccoli. Perhaps I should call this blog the aspiring watchful cook, as there are times when I get things wrong, but I guess now the difference is that I do something edible with the excess, rather than just throwing it away. Anyway, peas and broccoli: we’d already had risotto over the weekend, so my default soup making inclination kicked in. It was also another miserable day, not just grey and cold but absolutely chucking it down; I was drenched when I went out, so the comforting process of soup making seemed just right for the day – honestly if it wasn’t for leaves on the trees, you’d have thought it was November.
In terms of ingredients here, use what you have; I had the ordinary broccoli, but you could use sprouting and you can use frozen peas, too, but add them just before you add the stock, rather than sweating them in the butter and oil. I used both chives and flat leaf parsley as I had fragments that needed using up; I did think about mint and if this had just been a fresh pea soup, I think that would have been good, but I was wary about the combination of mint and broccoli. It also occurred to me afterwards that if I had had left over pancetta or prosciutto, that could have been crisped up and added as a topping, but I didn’t so I didn’t, if you see what I mean!
Serves: 4 as a starter or 2 for a light lunch Cooking Time: An hour or so
Ingredients
1 medium onion, finely chopped
1 small clove of garlic, finely chopped
olive oil
unsalted butter
200g fresh peas, rinsed and podded if necessary (mine came podded already)
1 head of broccoli, broken into small florets
0.75 ml vegetable stock (as usual, Marigold or Kallo is fine and if you have pods, let them steep in the hot stock for a while to boost the flavour)
salt and freshly milled pepper
cream, yogurt or creme fraiche
chives or flat leaf parsley, very finely chopped
Instructions
1
In a thick based pan or casserole, heat about 1tbsp each of olive oil and butter, add finely chopped onion and garlic
2
Sweat over a low to medium heat without colouring until they are soft and fragrant
3
Add the broccoli and mix around until well coated with the oil and butter mixture, add the peas and cook gently for two or three minutes
4
Add the hot stock, partially cover and simmer for about 30 minutes
5
When the soup has reduced by about 20% and the broccoli and peas are soft, allow to cool slightly, blend to a consistency that pleases you and adjust the seasoning
6
Serve in warm bowls, stir in your dairy of choice and top with herbs.
Notes
Scrumptious with the simple wholemeal bread posted elsewhere on this site.
We love wild red rice but gosh, it’s expensive! If you find cheap wild rice, I’d look very carefully at the contents as you may find that there is a small percentage of the contents mingled in with cheaper rice. My favourite is Organico Wild Red Rice, grown by the Picco family in the northern Po valley. The first time I encountered the rice fields of northern Italy, I felt as if I had been whizzed off to Asia, as I found it a strange experience to encounter this landscape in Europe, but of course this crop has been grown in Italy for centuries. The Rice Exchange in Vercelli is testament to the business – don’t be deceived by the modernity of the building; there has been an Exchange in Vercelli for centuries.
Flying over the rice fields of Northern Italy exposes the lattice of man made irrigation canals that date back, for the most part, to the mid 1800s but I have written elsewhere, at some length (too long – Edoardo) about the fascinating history of rice cultivation in northern Italy, so I shall shut up here. If you are interested in reading about the hows and whys of rice in Italy, nip over to the pages called Riso con Riso.
Anyway, back to the food. Saturday dinner was roast cod, peperonata, spinach and wild red rice. We have left-overs of rice and of peperonata, so what to do? The peperonata was easy as it makes a scrumptious if unconventional sauce for pasta. It works better if the peppers are sliced smaller – easily done in the pan with a wooden spoon if the peppers have been cooked for long enough – and I add more chopped basil. A suggestion of chilli (dried is perfectly fine) can also change the character of the dish so that it doesn’t feel quite so like left-overs.
The rice sat in its dish, staring balefully at me. I suppose there might have been a couple of heaped tablespoons so not a huge amount but no way was it going in the bin. Or even out for the birds…it’s May, they’re not starving. So, after a rummage in the fridge, a sort of Greek salad emerged.
Left-over red rice - about two or three heaped tablespoons
1 large salad onion or shallot, finely chopped
3cm piece of cucumber, peeled and chopped into 5mm dice (I also take out the wet seedy bit in the middle but up to you)
Half a red pepper, again chopped into 5mm dice
Half a dozen green olives, sliced into rings (they were already pitted)
About twenty chives, scissored into 2mm pieces
Chopped flat leaf parsley - about two tablespoons
Finely grated zest of half a lemon
100 g (ish) feta ( I happened to have some Waitrose barrel aged left but use what you have)
Half a large clove of fresh garlic, crushed with sea salt under the blade of a knife
Black pepper
Juice of half a lemon
Olive oil - about four or five tablespoons
Instructions
1
Mix the ingredients together using a fork rather than a spoon (means you won’t break the grains), to ensure even distribution and then mix up the dressing, tasting as you go.
Notes
We like small pieces in a salad like this, and I prefer the vegetables to be proportion to the size of the rice grains, but frankly that’s just my preference. If you like bigger chunks, use them! Also, use what you have in the fridge and in truth, on another day, this may have looked very different. I can imagine using left over broccoli, asparagus, grated carrot, walnuts, toasted pine nuts, orange in place of lemon (in which case, I think black olives would be lovely) and replacing the feta with shredded cold chicken, duck (oh yes - lovely with black olives and orange) or beef. It could be spiced with a scrape of cinnamon and sultanas for cold lamb…..I could go on and fear I might, so I shall stop and go and eat it. I am thinking that a glass of cold white wine (a personal favourite is Gavi) might go quite well……..
It is my observation that in Italy people do cook more from scratch, in all income brackets and across all the age groups. And EVERYONE can make a risotto (or at least everyone I know)! I know that some people regard it as a bit of a monster, but honestly, it isn’t. It is a really useful basic technique to have and I was very lucky to have been taught by a Milanese lady, in Milan, in the 90’s. So to my mind, I have been taught in the best possible way and have been given an understanding of and feeling for the ingredients that I’m not entirely sure you can get from books – or blogs! Making risotto is not something that is the same every time you do it and you need to develop (literally) a feeling for the way the rice is behaving in the pan: how heavy it feels, how it smells, tastes and even sounds. Unless you have a gifted donna Milanese to hand, the only way is practice, practice, practice.
Rice production is big business in northern Italy, the cultivation dating back as far as I can tell from my research, to about 1475 when Galeazzo Maria Sforza, Duke of Milan claimed that one sack of rice, properly cultivated, could yield another twelve sacks. He certainly promoted the cultivation of rice (and indeed the commercialisation of silk and wool weaving, although in most other respects, he seems to have been a bad hat), going so far as to sponsor the construction of canals for irrigation. There is evidence that the Romans knew of it as a costly import from India, the grain being reserved to make a dish served to those suffering digestive ills or to the very rich. By all accounts it sounds rather like our present day British rice pudding.
The industrialisation of rice production was hugely aided by the construction between 1863 and 1866 of the Cavour Canal. This takes water from Italy’s longest river, the magnificent Po, starting at Chivasso, north east of Turin and ending at Galliate, north west of Milan and all within the region of Piedmont. These days, rice harvesting is mechanised using what look to my untutored eye like combine harvesters and doesn’t look in the slightest like the scenes from “Bitter Rice”. In the past – in fact up until the 60’s – rice was harvested by hand by teams of women who would invade the rural rice growing areas to spend their days barefoot in water, bent double harvesting the grains by hand. They would be accommodated in fairly spartan barn-type buildings, which these days are being gentrified into designer homes. I do know of one remaining “dormitory” which having been abandoned, is now occupied only by wildlife. Edoardo and I are going to re-visit it shortly, as like a fool, I didn’t take any photographs when I was last there. I will post when I’ve revisited – just hope it is still there and hasn’t been swathed in scaffolding for rebuilding – not yet anyway.
So, to the recipe itself and I’ll talk a little about ingredients first.
You start with selecting the correct rice. Most important and I have been party to some spirited debates in Italy about which rice is used for which risotto! There are three grades of rice: semifino, the smallest grain; fino and superfino, which has the largest grain. Within each of those, there three varieties:
Arborio which makes a dense, sticky risotto, perhaps a tad stodgy but also tends to be the cheapest of the three and honestly, it makes a perfectly acceptable risotto for most occasions
Vialone nano has a round, thick grain (a bit like our pudding rice) and can take quite a lot of rough and tumble before it breaks (broken rice in a risotto can be a sign of poor technique) and is very absorbent. I use it with big, hearty ingredients
Carnaroli is my personal favourite with long, slender grains that can absorb enough liquid to be creamy but never go stodgy. If you are making a risotto with premium ingredients such as asparagus, saffron or seafood, I’d always recommend this rice as it is a little more elegant than say, arborio.
My favoured brands are Acquarello and Curtiriso, the latter partly because not only is it is good rice but also because their production process is carbon neutral. I usually bring both brands back from Italy but Curtiriso can also be found in the UK on-line at www.nifeislife.com If you can’t get either of these, use what you can get but please make sure it is rice actually grown in Italy – don’t be deceived by an Italian looking label!
You will also need onion or shallot. I prefer shallot, especially if I am making a seafood, saffron or asparagus risotto, as it has a more subtle presence. If you only have onion, don’t fret, just ensure you chop it finely so it renders down quite easily. You don’t want to see pieces of shallot or onion in the finished dish. Sometimes I use a stick of celery as well, but optional.
Stock is a subject that seems to send otherwise sane, pleasant people to borders of insanity. Yes, life would be wonderful if one had a permanent supply of freshly made vegetable/chicken/veal stock on hand and sometimes I do have it. I do know of someone who declaims that “no Italian would make risotto from a cube so I don’t”. Huh, this from someone who has never been inside an Italian’s kitchen, speaks no Italian and – here’s the paradox – buys ready grated Parmesan. Don’t let absence of fresh stock deter you from making a risotto, but do choose your cube or powder with care. I can recommend Kollo, Marigold and an Italian brand called Star. The latter do a porcini flavoured cube which is excellent for an autumnal risotto al funghi and if you’re in Italy, they are in every supermarket and take up no room at all to bring home.
Cheese – ah, now this is probably where I become borderline insane. Ready grated Parmesan is not worth spending money on. There, I’ve said it, but honestly, I can find nothing good to say about it. Please, please if you only do one thing to upgrade your risotto, buy your Parmesan or Grana Padano in a biggish piece, preferably 18 – 30 months old. You don’t need fancy-smancy graters, either. I just use a normal three sided grater (of venerable age, I might add) and I use different sized grating faces, depending on whether the cheese is going in or on the risotto. I am writing extensively elsewhere about the virtues of Parmesan and its history so will leave it there for now.
Alcohol. It is nice to slosh some white wine into a risotto but in fact, I use Martini Extra Dry more often as we don’t drink that much white wine. And talking of which, what has Martini done with those fabulous fin de siècle bottle labels? This new minimalist label looks a bit “supermarket own brand” to me. Anyway, again, if you don’t have anything, don’t let this deter you from a risotto.
Butter. Possibly another of my rants coming on here, but I’ll try to contain myself. The final step in making a risotto is the mantecatura. This is resting the risotto and adding cold butter and grated cheese (not the latter for seafood or fish) and stirring in an enthusiastic manner until everything is creamy and emulsified. Please, please do not use salted butter, it will radically unbalance the seasoning and it you who controls the amount of salt in this dish. Salted butter has its place (hot, buttered toast!), just not in a risotto.
OK let’s start. Oh, sorry. One last thing. Risotto making will be easier if you have a pot or pan with a thick, heavy base and fairly shallow curved sides. Curved sides make it easier to scrape up and include every grain of rice and stuff doesn’t get stuck in corners, because there aren’t any! For stirring, I use a wooden spoon as it much gentler on the rice than metal and I can’t stand the sound of metal on enamel. Again though, don’t let absence of the perfect utensil put you off at first. If you become a devoted risotto maker, then you might want to save up and invest in perhaps a Le Creuset Buffet Casserole, which for me, is the perfect pan for this dish. Having said that my teacher in Milan had a battered old double handled shallow aluminium pan that belonged to her grandmother and which was the workhorse of her kitchen.
Serves: four as a first course, two as a main Cooking Time: About an hour including prep
Ingredients
1 small onion or shallot, finely chopped
1 clove of garlic, crushed with a scrap of salt under the blade of a knife
50g unsalted butter
400g Carnaroli rice
2.5 litres of hot stock
100ml or so of dry white wine or Martini Extra Dry
salt and freshly ground black pepper
To finish
75g cold unsalted butter, in small cubes (dice sized)
100g or so of finely grated Parmesan or Gran Padano
Instructions
1
In a separate pan, keep the stock simmering and melt the butter over a low heat, adding the shallot and garlic
2
(In the spirit of sharing and pragmatism, I will say here that if I am making risotto with stock powder or cube, I make it with boiling water in a good old Pyrex jug and it stays plenty hot enough during the making; if it cools too much, I just heat it up a bit in the microwave)
3
Allow shallot to soften and become translucent but there must be no colour at all, which would adversely affect the flavour
4
Turn up the heat a bit to medium and add the rice and stir enthusiastically
5
Ensure the grains are well coated with the butter and are cooking well; you will notice that the dish is making slightly different noises once you have added the rice
6
Do not allow the rice to take on any colour. Confusingly this phase is called tostatura in Italian but toasted looking is not what we want here!
7
It is however, important that the dish is hot before we add the alcohol
8
Add the wine or Martini, keep stirring and allow the wine to almost evaporate
9
The mixture might look quite dry at this point
10
Add a ladle-full of stock and stir, scraping down the sides and across the base of the pan
11
We need the rice to cook evenly so it all needs to move around and evenly absorb the stock
12
Don’t let it catch on the bottom or sides of the pan - any taint of scorching will ruin the dish
13
At this point, I sometimes turn the heat down a tad; you want the risotto to bubble steadily but not at a rampant boil
14
Again, you will notice that the dish has changed its soundtrack
15
After the first ladle has mostly been absorbed, but the risotto is still runny and mobile, add another ladle-full
16
Keep going until you have achieved a moist and mobile consistency but not dry
17
If it is too liquid, looking more like soup than risotto, let the rice absorb the excess stock and also the stock to evaporate
18
It’s easier to slacken off a too-stiff risotto than serve a dismal, soupy dish with excess stock puddling on the plate
19
Take the pan off the heat and allow everything to rest for a moment.
20
This includes the cook who should have been working vigorously up to this point. A fine moment for a reviving slurp of something, I find. For me, I mean, not the risotto.
21
Now for the mantecatura:
22
Quickly beat in the cold butter, working as you would to stir polenta
23
Add the cheese and taste for seasoning - if the stock and cheese are salty you may not need salt at all
24
Test that you have the correct consistency by tipping the pan sideways; if you have got it right, it should ripple like a wave, hence “all’onda”
25
Serve in warm shallow bowls with extra cheese or put the whole lot in a warm dish on the middle of the table and let everyone help themselves
26
if you are making a risotto with additional ingredients, for example mushrooms, nettles (yes really - delicious), asparagus, I usually add the prepped ingredients after the rice and before the wine. There are other schools of thought and all are correct - this is where you do what works for you and I have written about specific risotto in other posts. This is the point where I will say that personally, I dislike cheese with a fish or seafood risotto and you will not find it in a proper risotto in Italy, but again, if it floats your boat….
Notes
If you would like very detailed guides to risotto making, I would unhesitatingly recommend the following:
Made in Italy, Food and Stories by Giorgio Locatelli, published by Fourth Estate - a wonderful book, from which I have learned so much
The Classic Italian Cookbook by Marcella Hazan, my copy is published by Papermac; I think this might be out of print in this format but second hand copies are available
My copies of both of these books are stained, splashed and have broken spines where they have been forced flat in my kitchen. That may offend some book lovers but to me, they are honourable battle scars and demonstrate the genius of the author in creating something so manifestly fit for purpose.
My final words are to implore you not to get stressed about risotto, which can, in the UK, have a reputation for being tricky achieve and do remember that in the Italian language, “riso” not only means rice but also laughter!
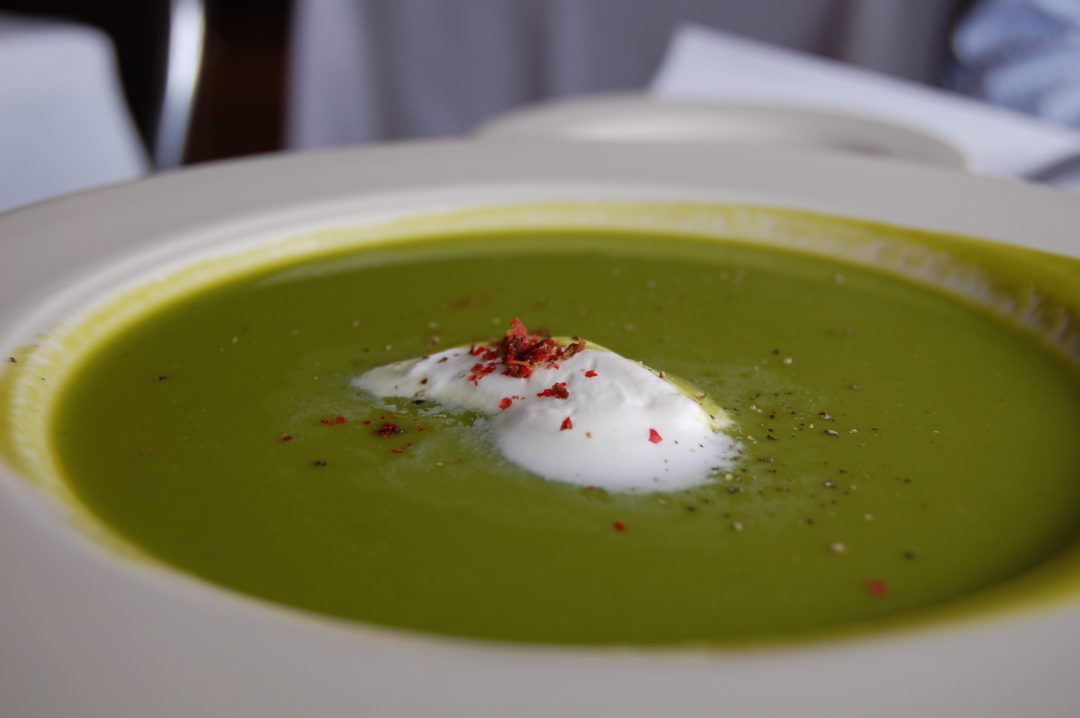
I love making soup and it is a default when I open the fridge and am faced with left over broccoli or pretty much anything. This soup is so delicious, however, that I encourage you to buy asparagus just for this. You can sometimes find sprue, which is thin, weedy stuff that would get sand kicked in its face on the beach, but is fab for soup making and is cheaper than the muscly stuff you need for cooking naked (the asparagus, not you….but I’m not here to judge). Markets are better hunting grounds for this than supermarkets and keep your eyes peeled, especially towards the end of the season. The quantity is fairly arbitrary, as you can just adjust everything else dependent on how much “grass” you have. I usually make soup in an ancient and much loved Le Creuset 20cm casserole, but as long as whatever you use has a thick base, use what you have. In terms of finishing the soup, my preference is Ivy House Farm (ivyhousefarm.com) Jersey single cream (available from farmdrop.com) and a miniscule amount of finely chopped chive, but this is good with yogurt or creme fraiche and parsley. I have tried this with mint, thinking it was a summer herb and might complement the asparagus well. Horrid: what was I thinking. Only thing I would caution against is swamping the wonderful asparagus flavour by using too much of any of your preferred finishes. Oh and I don’t think this works as a chilled soup either, but try it – you might think differently!
750 ml hot vegetable stock (Marigold or Kallo is fine)
chives or flat leaf parsley
cream, yogurt or creme fraiche
salt and freshly ground pepper
Instructions
1
Add 1tbsp of oil and 1 tbsp butter to pan and add shallot and garlic, keep heat low to prevent colouring and soften, added a modicum of salt at this point
2
While this is happening, chop the stems into pieces about 1cm long, after snapping off and discarding any woody ends
3
Add to the pan and stir around cooking gently without colouring; add some freshly ground pepper at this point and then add the stock
4
Partially cover and simmer for about 25 minutes; the asparagus needs to be soft and the liquid to have reduced by about 20% in order to concentrate the flavour
5
Turn off the heat and allow to cool slightly
6
Blend to the point that pleases you: sometimes I like a very smooth soup, other times, I like to see a few green chunky bits bobbing around. If I want it to be very refined (not often!), I will sieve it but for me, adding refinement also risks removing some precious asparagus flavour
7
Serve into warmed dishes, stir in your choice of dairy and sprinkle lightly with finely chopped herbs
Notes
Serves four as a starter or two for a substantial lunch with Ballymaloe Bread. This also freezes well if frozen prior to adding the cream and I quite like having some squirrelled away for those cold summer days that we inevitably get in the UK.
I suppose this is based on a quiche but having experimented, I have decided that for me, a shallow tart with a crisp, short pastry gives the elegant proportions for asparagus. With other ingredients, I might use a higher proportion of filling to pastry (ie a deeper tart) but somehow, this works well as a light, summery savoury tart. Oh, and I unapologetically use my Magimix for making pastry, as I don’t have a light hand with pastry, but do what works for you! In terms of the cheeses, I have made this with Cheddar, Cheshire, Emmentaland Gruyere in the egg mixture and it’s worked well. Parmesan in the mixture was less successful, as was Roquefort, both of which overpowered the asparagus (although I have other recipes using both of those in the mixture that are yummy). Dusting the top with Parmesan isn’t essential either and you can equally use Padano. We love this served warm, not hot, with a crisp green salad and a chilled white wine. I prefer not to use lemon juice in the salad dressing where I’ve used asparagus; somehow, for me, the flavours of asparagus and lemon fight unpleasantly so I avoid putting them together on the same plate.