Newsletter

Autumn/ Spring/ Summer/ Suppers, Dinners & Main Courses/ Winter

FEEDING PEOPLE – EASY BAKED SALMON

Colourful, healthy and SO easy.

Let me state right up front, I love to have a table full of people for whom I’m cooking. Don’t much mind if I’m just making a giant risotto for twelve with antipasti first and green salad then fruit and cheese, or a full scale cordon bleu high French cuisine meal for four. Have to say the former scenario is less stressful and much easier on the budget. On reflection, I am not sure anyone really entertains at home in that formal way any more and I can’t stand it when home entertaining becomes a competitive sport.

On that basis, I am going to do a series of occasional posts talking about recipes and tips I have found useful when feeding people at different times of the year and of the day. I will probably include a few failures as well, on the basis that I’m human!

Having said that, having friends round their table is something that sometimes worries people though, so this post is giving you an absolutely foolproof main course that can be put on the table in under 30 minutes, is stress-free and can be done even if you’ve over done it on the aperitivi before you get in the kitchen…not that I have any experience in that regard…

Before we get to the recipe, I would like to emphasise that the quality of ingredients here is crucial: when we cook something this simple, the flavours must be clear and authentic, so do try to find the best you can and in the case of the salmon, preferably organic.

In terms of setting this within the context of say, a three course meal, I usually give people either a simple soup (prepared the day before) or a cold starter (Roquefort, pear and walnut salad is a crowd pleaser and dead easy), followed by a big bought tart, fresh fruit and cheese. Again, very simple so look for the best you can afford.

While I’ve been writing this, I have come to the conclusion that I really don’t like the word “entertaining” in this context. It’s all a bit Abigail’s Party (find it on You Tube – it’s genius) or 1980’s Cuisine Minceur (don’t bother Googling that – dreadful phase in food; everything served on black octagonal plates and so tiny you just wanted to make a pile of buttered toast once home). Having people round a table, eating good home cooked food (ahem, apart from puddings…) accompanied by conversation and laughter is one of great pleasures. Yes, wine helps but some of the best conversation round our table has come from teetotallers or designated drivers. On second thoughts, maybe there is a correlation there…

That’s a long paragraph to describe why I dislike the pretensions that can accompany feeding people at home and I still haven’t found a word to replace entertaining, so I am going to leave it at “feeding people” and hope it doesn’t make me sound too institutional!

Don’t be deterred by the length of these recipe; it is dead easy and when you’ve done it once, it will all slot into place and you’ll do with your eyes closed – or after a few aperitivi
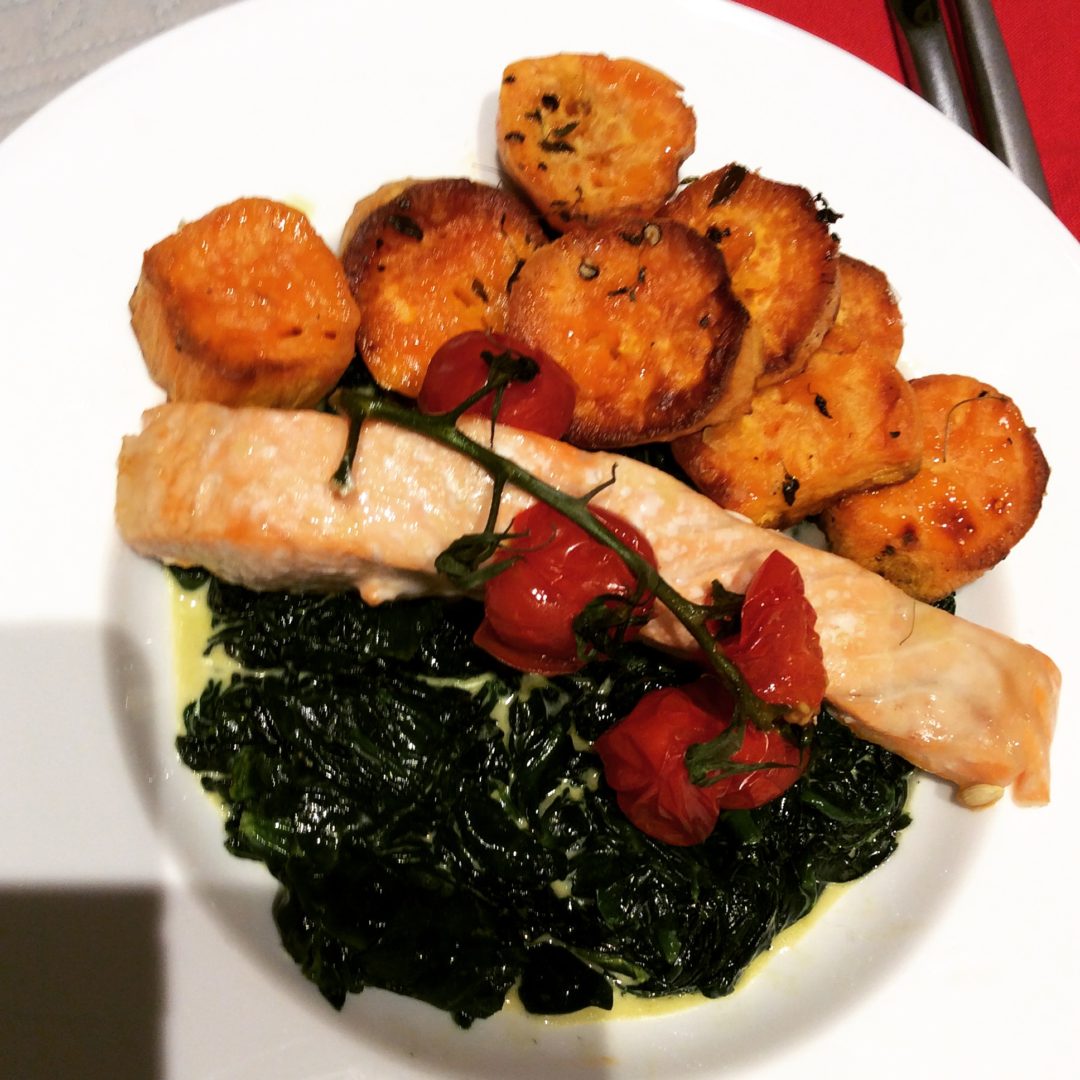
EASY BAKED SALMON

Print Recipe
Serves: as many as you like Cooking Time: 30 minutes

Ingredients

  • 1 fillet of organic salmon per person
  • 1 slice of Parma ham per fillet (optional - see notes)
  • bay leaves
  • olive oil
  • 1 lemon
  • small bunches of cherry tomatoes, left on the vine
  • sweet potatoes, say, 1 chunky one per person but depends on appetites!
  • mature spinach (not those wimpish “baby”leaves that are for salad but have no flavour when cooked); buy more than you think you can possibly eat
  • fresh or dried thyme
  • 1 clove garlic
  • butter
  • double cream or creme frâiche
  • salt
  • black pepper
  • nutmeg

Instructions

1

Pre heat the oven to 200 degrees/180 degrees fan

2

Peel the sweet potatoes and cut into chunks about the size of a golf ball

3

Wash the spinach in two or three changes of water and leave in a colander to drain

4

Put olive oil into a shallow baking tin or oven proof dish, add the chunks of sweet potato ensuring they are all well coated with oil

5

Add black pepper, thyme and a smashed garlic clove (no need to peel it)

6

Put in the oven for 20 minutes

7

Take a second oven proof dish and add a drizzle of olive oil - just enough to lubricate the base

8

Pat dry each salmon filet and wrap each in a slice of Parma ham with the “seams” underneath

9

Slot a bay leaf under the ham, on top, with the tips poking out

10

Add the tomatoes to the dish, with the salmon, making sure they have a drip of olive oil of them but aren’t swimming in it

11

Put in the oven proof dish and wait until the sweet potatoes have had their 20 minutes

12

At that point, turn over the potatoes and return them to the oven

13

Put the salmon in the oven and set your timer for 15 minutes (Note that this time is for a slender fillet - if you have gone for a chunkier size, add a few minutes)

14

About 5 minutes before time is up, take your largest pan and melt a good sized knob of butter

15

When it has foamed, add the spinach and ensure it is all well coated with butter

16

Add a pinch of salt, put the lid on and leave it alone for about four minutes over a medium heat

17

When the time goes off for the oven; switch off the oven and leave everything in there while you finish off the spinach

18

Take the lid off the spinach and you’ll see it has shrunk beyond belief which is why I recommend you buy more than you think you’ll need

19

Drain it through a colander in the sink and then take an old saucer or small plate and press down hard on the spinach to force out as much of the liquid as possible

20

(You can do this to this stage a couple of hours in advance and in some ways that’s better, as it does give the spinach time to properly dry out)

21

Return the resulting green heap to the pan over a low light and move it around a bit more to drive off more liquid Turn up the heat to medium and add a couple of tablespoons of double cream or creme frâiche, heating until it bubbles and sizzles

22

Add black pepper and freshly grated nutmeg

23

Turn off the heat, plate up the fish and tomatoes put the potatoes and spinach in serving dishes - job done

Notes

This is colourful, healthy and not too expensive, especially if you replace the sweet potatoes with lentils or brown rice and leave out the Parma ham In truth, the method for this meal can be adapted for any firm fish such as cod or haddock and the spinach replaced by whatever green veg is in season, so do experiment and find your own speciality that you can produce with your eyes closed - or after a few aperitivi!


Autumn/ Courses/ Lunches & Light Suppers/ Seasons/ Suppers, Dinners & Main Courses/ Winter

A FACE ONLY A MOTHER COULD LOVE

I have been, as they say, unavoidably absent from these pages for the last few weeks as the builders began the work on the London flat and I had forgotten how much a big refurb project can take over your life. And it’s not the big stuff like choosing the kitchen and the bathrooms; it’s the small stuff. I was sitting on the Tube, quietly trying to read Jay Rayner and listen to Bach (what a pair) and I happened to glance up at the advertising. Normally quite safe, as the habitués of that space seem to mostly be wifi providers I’ve never heard of and dodgy looking money transfer outfits. Not this time; now I was invited to consider how meaningless my life would be without electrical sockets that have built in USB ports….what? Genius. Straight on to the builder, who has the patience of a saint. So you see, I haven’t been safe from the damned project even on the Tube. and I am trying to find all kinds of displacement activity to avoid choosing new door furniture. And tiles. And timber flooring. And paint colours…..so talking about the ugly sister of the vegetable world is a delight.

A few weeks ago, I mentioned celery, the Cinderella of the veg world, so let me introduce you to the ugly sister: celeriac. Honestly, it has a face only a mother could love, but it is, in this country at least, the unsung heroine of the vegetable world. I was delighted a couple of weeks ago to receive in my farmdrop.com order a complete plant, as per the picture. This was completely unexpected as normally in the UK, one only gets a trimmed root, which while less startling than the complete plant, still looks a bit like a turnip with a hangover. There the resemblance ends.

Every bit of a complete plant can be used, although there is a fair bit of waste when one trims the root. If you’re lucky enough to own a compost heap, then that isn’t a problem but it is important to trim off every bit of hairy root and any yellowing stalks or leaves. The stalks aren’t really bold enough to use raw, as in cultivation, the energy has gone into creating the lovely big root, but they are fine for using in soups or risotto (excellent in the latter with a morsel of Gorgonzola). The leaves can be used as a herb, so again good in soups, stuffings, risotto and with lentils, quinoa or cous cous.

The root, which is really the focus of this piece, makes wonderful soup but one of my very favourite things to do is put a whole celeriac, cut into chunks, under a roast chicken, mixed with garlic and thyme. I also put a couple of chunks inside the cavity with thyme and half a lemon, salt and pepper. When the chicken is done, keep the bird warm and put the roasting tin with all the celeriac and garlic gunk over a low flame (if there is a lot of fat, just pour most of it off), mix it up with a wooden spoon (the celeriac and garlic will be very soft by now), gradually add as much white wine as will make a deeply savoury sauce and simmer for a few minutes stirring all the while. A few green peppercorns won’t come amiss and although I have tried it with a spoonful of creme fraiche, for me, that’s gilding the lily. This isn’t a sophisticated dish but is very satisfying and people who have eaten this have always asked for the “recipe”. I think, however, that it is so simple as to barely qualify as a recipe, so it’s here and not written up as a recipe proper.

I also love celeriac incorporated with potato mash, but it does retain more water than potato, so I always steam it if I’m going to mash it. It’s also great as part of a platter of roast root veg; in particular it seems to pair and contrast well with roast parsnip (another less than lovely looking vegetable). Above all, it is stupendous in soup and the recipe that follows is wonderful. I can claim no credit for this, as I discovered it in the staff canteen where I worked; the chef was so pleased to have someone ask for a recipe you’d have thought it was his birthday. I have tweaked it a bit to please our palates more and despite the slightly unlikely combination of ingredients, do please give it a go. I promise you, it’s fab.

Celeriac, Coconut and Chilli Soup

Print Recipe
Serves: 4 normal people or 2 greedy ones Cooking Time: about an hour

Ingredients

  • 2 tbsp butter
  • 900g of celeriac root, peeled and chopped roughly
  • 750ml chicken or vegetable stock
  • juice of a lime
  • 2.5cm piece of fresh ginger, peeled and grated
  • 1 tsp lemon or ordinary thyme leaves, chopped finely
  • 1 green chilli deseeded and chopped
  • small bunch of fresh coriander, separated into stalk and leaves
  • 250 ml full fat milk (if you insist on using semi or skimmed milk, make something else)
  • 75g creamed coconut
  • grated zest of the lime

Instructions

1

Heat the butter and add the celeriac, cover and cook gently for about 10 minutes but don’t allow it to brown

2

Add the stock, lime juice, ginger, (lemon) thyme , chopped chilli and coriander stems

3

Bring just to the boil, cover and simmer for about 30 minutes

4

Add the milk and simmer uncovered for about another 15 minutes; you’re looking for the liquid to reduce but never boil

5

Remove from the heat, add the creamed coconut

6

Use a stick blender until you have a smooth soup; flecked with green from the chilli and coriander stems

7

Season as you please and garnish with grated lime zest and chopped coriander leaves

Notes

If, like me, you’re not too keen on coriander as a herb (love the seeds), use flat leaf parsley instead. Also feel free to use a different chilli and in fact, I have made this with dried crushed chilli. Both of these changes will alter the flavour slightly, but of course, it is still a delicious, warming soup that is a bit different.


Autumn/ Courses/ Lunches & Light Suppers/ Suppers, Dinners & Main Courses/ Winter

CINDERELLA CELERY

I will come right out and say I love celery and its root, celeriac. Love them to bits and happily crunch away on both of them. But they have a bad reputation; the stalks seem forever associated with the deprivation of a rigid low calorie diets, and celeriac usually evokes a puzzled look and a comment about how ugly it is.

Wrong, just wrong. Good celery is a staple ingredient for soffritto in Italian cooking and mirepoix in the French canon but the critical word there was “good”. I am sorry to say that so much of what is sold in the UK comes from Spain and is weak, feeble and hollow. Honestly, I’ve had Spanish celery – and Israeli come to that – you could use as drinking straws. The stalks shouldn’t be hollow and yellowy, and a good head of celery will feel quite heavy for its size. Oh and smell fresh and very celery-ry.

It is true to say that there is both green and white celery, but don’t mistake pathetic yellowing specimens for the delicious blanched Fenland celery that can be had in the UK during November and December. This has a strong distinctive flavour and like asparagus, has a short season, so do make the most of it while we have it.

Green celery is available more widely but UK grown, flavourful celery seems mostly available September to April and I have it my fridge most weeks during that time, with an interregnum for the Fenland crop.

This unsung hero is just so useful; I put it in risotto, lentils, soups, quinoa, couscous, stews and casseroles, not to mention cutting short lengths, filling with Gorgonzola and dusting with paprika. I know it sounds a bit Abigail’s Party, but I love it! It also earns a place on a cheese board with grapes and figs, which frankly I prefer over biscuits after a meal. I also use the leaves chopped up as one would a herb, but go gently as the celery flavour is very concentrated here.

Anyway, the celery I had from https://thefoodassembly.com/en/assemblies/8012/products was just gorgeous and although a fair amount was eaten with the lovely Slipcote cheese, I had enough left for this lovely soup which has a distinctly celery flavour and is creamy in texture, without needing the addition of any dairy (although you can add it if you want to!).

Celery Soup

Print Recipe
Serves: 2 - 4 Cooking Time: 30 minutes

Ingredients

  • 1 tbsp butter
  • 2 tbsp mild olive oil
  • 1 medium onion, peeled and chopped into small dice
  • 1 small clove garlic, chopped finely
  • 2 small/1 medium potato, peeled and chopped into small dice
  • 150g celery stalks, chopped into slices about 0.5mm wide
  • 1 slim leek, washed, sliced in two lengthways, then sliced into slender half moons
  • leaves stripped from two sprigs of fresh thyme
  • 1 heaped tsp Marigold reduced salt bouillon
  • 1 litre hot water
  • salt and freshly milled black pepper

Instructions

1

Heat the butter and oil in a heavy based saucepan and add the onion and garlic

2

Allow to soften but not colour and add the remaining vegetables and thyme

3

Soften for about 15 minutes but do not allow to colour

4

Add the Marigold powder, mix in and then slowly add the water

5

Season and mix well, bringing to a simmer but don’t let it boil

6

Simmer gently with the lid askew for about 30 minutes until the vegetables are soft and can be easily squashed against the side of the pan

7

Cool slightly and use a stick blender to process until smooth; the addition of potato will give the soup a very smooth, almost creamy texture so you don’t have to add dairy to finish the soup

Notes

My favourite finish are garlic croutons and in the picture, you will see a small swirl of Jersey milk, but in truth, it was gilding the lily. This freezes well, but freeze minus any dairy you might want to use.

Autumn/ Courses/ Lunches & Light Suppers/ Summer/ Suppers, Dinners & Main Courses

NEW SUPPLIER, NEW INGREDIENT

In my efforts to shop with a shorter supply chain and closer to the supplier, I have tried my local Food Assembly. This is a network of local organisations which allow local suppliers to deliver food to organised distribution points after you order on line. I used https://thefoodassembly.com/en/assemblies/8012/products Putney Food assembly. organised by the lovely Floriane and supplying amazing fresh food, bread, dairy and fruit. Oh and there’s jams, jellies and chutneys too, one particular jam coming from as close as a garden in Mortlake. Price wise, well, for the fruit and veg, frankly, no more expensive than a supermarket, but of greatly superior quality. The preserves were a little more expensive than the mid range brands, but in the same ball park as the higher end brands.

It was great fun picking up the order, as it was all set out in a room in a pub on the embankment in Putney, for collection between 6.30 and 8.30. Easy parking (although I went on the bus) and you can have a drink while it’s all happening (hence me going on the bus….). The quality of produce was superb – as if I’d picked it from my own garden (I wish) and the cheese I tried was wonderful. I am sorry to report that that evening we put away the whole 100g of Sussex Slipcote Soft Sheep Cheese with Garlic and Chives with celery and multi seed sourdough, both from the Assembly.

Although it is strictly speaking a bit early in the season, I had ordered celery which I love for not just its flavour, but also its versatility. The stems were a little on the slender side but the flavour was wonderful – a mile away from flaccid supermarket stalks. The new ingredient for me was Rainbow Chard; I’ve had it served in Italy and I do like the flavour but in the UK, have always been deterred from buying it by the price and by the fact that in the supermarket, it looks faded, dusty and ready for its bus pass. Anyway, this was positively juvenile in what I can only describe as a huge bouquet and squeaky fresh. Couldn’t wait to try it, so after having it using Nigel Slater’s gorgeous recipe for Chard with caramelised onions and sultanas (in Nigel Slater’s The Kitchen Diaries Volume III), I still had lots left.

I remembered that I’d had it in a quiche in Treviso about three years ago so had a rummage around for recipes. There wasn’t one that I liked the sound of in its entirety, so this is very much my own recipe, following fairly standard quiche principles which I have tweaked to satisfy my likes and if I’m honest, what I had in the fridge. My Rainbow Chard had brilliant gold and ruby stems which was criminal to chop up completely so I used eight of them as spokes around the quiche. Very attractive looking but will cook them for longer next time as they could have done with being a bit more tender. And when you strip the leaves form the stalks, do make sure you get rid of any nasty stringy bits.

When it comes to pastry, I prefer to use a richer shortcrust pastry, using butter and egg yolk with a small quantity of ice cold water as it always turns out very short and crisp. It is a tad more difficult to work but I find it do-able if it’s left to rest for at least an hour. I haven’t included the recipe here, as you probably have your own favourites but the quantity I used was from 170g of plain flour and 100g butter.

Rainbow Chard Quiche

Print Recipe
Serves: 6 - 8 Cooking Time: 30 minutes

Ingredients

  • 170g rich shortcrust pastry
  • 150g rainbow chard, well washed, leaves stripped from the stalks, keep the 6 - 8 nicest stalks for the centre, chop the rest into small dice and slice leaves into narrow strips
  • 70g pancetta, chopped into 1cm dice
  • 1 shallot, finely chopped
  • 1 small clove of garlic, finely chopped
  • leaves stripped from two sprigs of fresh thyme
  • 150ml creme frâiche
  • 3 medium eggs
  • 50g finely grated Parmesan cheese
  • 23 cm loose bottomed flan tin
  • oven tray

Instructions

1

Pre-heat the oven to 200 degrees C/180 degrees fan and put in the tray to heat

2

Line the flan tin with the pastry and bake blind in usual way

3

Meanwhile, put the pancetta in a non stick sauté pan over a medium flame and cook until the fan runs and the pancetta has taken on colour

4

Remove from the rendered fat and drain on kitchen paper

5

Soften the shallot and garlic in the pancetta fat, adding a little mild olive oil if necessary

6

Ensure they are soft but not coloured and then remove and drain on kitchen paper

7

Add the chard stalks to the pan and allow to soften without colouring; the whole stalks will need longer so you might want to put then in first

8

While all this is going on, crack the eggs into a large jug and beat well, stir in the creme frâiche and mix well and follow with the finely grated Parmesan

9

Add the thyme leaves and season, remembering that both the pancetta and cheese will add salt

10

When they are softened, remove the chard stalks from the pan and drain

11

Add the sliced chard leaves to the pan and also allow to soften but not colour or frizzle - add a little more oil if necessary; remove and drain

12

Spread the onion, garlic, pancetta and chopped chard stalks and leaves over the baked pastry case

13

Pour over the egg mixture carefully and make a pinwheel pattern with the whole chard stalks

14

Place the tin on the oven tray and bake for 25 - 30 minutes until the filing is set and it is a lovely golden colour

15

Serve warm or cold with a green salad or vegetables

Autumn/ Courses/ Lunches & Light Suppers/ Summer/ Suppers, Dinners & Main Courses

#SUPERMARKET SIESTA 3

I am bit late posting part three of my Supermarket Siesta as we’ve got builders in. Not here, thank heavens, but I had forgotten how much time it takes to choose bathrooms, especially when there are two of you trying to make the decision. It is quite amazing how strongly one can feel about taps, or should I say mixers. It is a curiously British habit to have separate taps in the bathroom and frankly idiotic, although we did agree on that. Anyway, this is not the purpose of this blog but I do feel better having got that off my chest, thank you.

You’ll know by now that I’ve been taking a day from the weekend and comparing costs between shopping from a non-supermarket source and an on-line supermarket. So far, the previous two blogs have been in favour of the non-supermarket source, cost-wise, but to be honest, I have been waiting for this to end! It almost seems too good to be true so this weekend, especially because we were having cod, I was expecting this to be the week it ended. Cod is rightly now an expensive fish; cod stocks were abused for too long and we should have to pay a premium for this beautiful fish, not to mention the fact that trawler men face danger every time they set out to sea. It therefore makes perfect sense to me that its price is where it is.

Anyway, here is what Sunday looked like for us:

Breakfast

Jersey milk yogurt

Blueberries

Lunch

Piedmont peppers

Buffalo Mozzarella

Pagnotta Sourdough

Supper

Pan fried cod finished with beurre blanc

Sweet potatoes roasted with thyme and garlic

Cavallo nero finished with olive oil and nutmeg

Runner beans

We had been given gorgeous chocolate from guidogobino.it in Turin, so that was dessert. Too many, in truth…..although I will post about them another time, as their chocolate is out of this world, even for a non-sweet tooth person like me.

Anyway, bearing in mind ingredients like olive oil, thyme, anchovies, salt and pepper are for me, store cupboard ingredients so I haven’t included them, I was absolutely astonished this week by the price difference. I had to have my maths checked (that not being my strong point…) to ensure I’d got this right. All the ingredients came from lovely Farmdrop.com as with the builders etc, I just didn’t have the bandwidth to shop around or go to Borough Market. Which actually, kind of makes another point; if you’re time-poor, you don’t have to rely on a supermarket when there are other suppliers around who can deliver flavour, cost efficiency and ethical supply chains.

So, Sunday cost us £22.15 and had I sourced from the same on-line supermarket I have used for comparison so far, the bill would have been £30.68. That (I am reliably informed!) is a staggering 38% more expensive.

I guess if your budget isn’t an issue, then this is irrelevant for you but ethical supply chains are, I hope an issue for many of us and flavour and freshness are surely top of any cook’s list? Shopping more closely to the supplier gives much fresher ingredients and I have noticed a discernible difference in the flavour of the food I’m serving. I can assure you it isn’t because of any step-change in my cooking abilities and in fact, in may ways, I am preparing food more simply. I just don’t need to make my home cooking complicated when I am using such beautiful ingredients – life is better all round.

So, the recipe this week is something I mentioned a week or so ago – Piedmont Peppers – and we do eat it quite a lot this time of year as all the ingredients come together seasonally. You can make other times of the year but the ingredients won’t be seasonal, will have probably covered many food miles and this will be reflected in the flavour.

It works well with green salad and good bread as a light lunch and also as a starter. It is easy to multiply up to feed lots of people in a buffet, or to include as a table of anti pasti if you are serving Italian style.

I first cooked this many years ago, using Elizabeth David’s recipe but have been fortunate enough over the years, to see this cooked in Piedmont home kitchens, so have modified my way of doing things. This, however, is very much my way of doing this lovely dish but I encourage you to experiment to find you own favourite way.

Piedmont Peppers

Print Recipe
Serves: 2 - 4 depending on how/when you serve Cooking Time: 45 minutes

Ingredients

  • 2 red peppers (look for heavy, fleshy specimens with the stalks intact)
  • 3 San Marzano tomatoes, skinned
  • 4 anchovy fillets (make sure you rinse them well if you are using salted)
  • 2 cloves garlic, sliced thinly
  • fresh basil leaves
  • extra virgin olive oil (I like Ligurian oil for this but if you prefer a more peppery oil, that's fine too)
  • freshly milled black pepper
  • an oven proof baking dish or baking tray with a lip

Instructions

1

Pre-heat the oven to 200 degrees c/180 fan

2

Slice the peppers lengthwise, trying to slice through the stalk and preserving it as part of the pepper

3

Remove all the seeds and white pith

4

Sit in the oven proof dish, propping them up against each other if you have any wobbly specimens

5

Pour a couple of teaspoons of oil and an anchovy fillet into each pepper

6

Add a few slices of garlic and a torn basil leaf to each pepper

7

Season with black pepper

8

Halve the tomatoes lengthwise and add to the peppers

9

We like a good amount of tomato, so cut them to make them fit, although you do not want chopped tomato

10

Pour over a little more oil to moisten the tomato and tuck in more basil if you can

11

Put in the oven for about 45 - 50 minutes, until the peppers are a little blackened round the edges and they look relaxed and wrinkly

12

Best served warm or at room temperature; too hot or too cold and the flavours are lost

13

There are squabbles in our house about who gets to mop up the lovely savoury juices and I would implore you not to waste them.

Notes

I have tried this with yellow peppers - nope, doesn't work. The full, red ripeness is needed for the flavour to be at its best. I have used yellow peppers but then altered the ingredients to include capers and black olives but then they are not Piedmont Peppers! Lovely, but not Piedmont Peppers as I was told in no uncertain terms when in Turin.


Autumn/ Courses/ Lunches & Light Suppers/ Seasons/ Spring/ Summer/ Suppers, Dinners & Main Courses/ Winter

BAKED EGGS

This is such a simple recipe, I am wary of actually posting it but a good friend said that she’d never thought of it, so why not?

I think this is something that you can throw together from things you mostly have in the house anyway, plus the fact that you can add all kinds of bits you might find lurking in the fridge. I recently used a few scraps of left over Parma ham; any small pieces of salami are also good but I am reluctant to use anything fishy as i just can’t imagine how it might test. Although it might be good with lovely Morecambe Bay shrimps?

Apologies too, for the dayglo cheese; I was using up a bit of left over Red Leicester and it does come up bright! Tasted good though and that’s what counts.

Baked Eggs

Print Recipe
Serves: 1 Cooking Time: 8 - 9 minutes

Ingredients

  • scrap of butter for greasing
  • 1 tbsp butter
  • i small leek washed and sliced finely (or a small shallot finely chopped)
  • 1 large tomato, skinned and cut into 1cm dice
  • 2 medium eggs
  • 2 tbsp cream or creme frâiche
  • 2 tbsp grated cheese
  • 2 tbsp breadcrumbs
  • Salt and freshly milled black pepper
  • small oven proof dish, buttered

Instructions

1

Pre-heat the oven to 180 degrees C/160 fan and put in an oven tray to heat

2

Melt the butter in a small pan on a medium flame

3

Add the leeks and soften but don't allow to colour

4

Remove from the heat and drain well on crumpled kitchen paper (don't omit this step as to do so will render this dish too greasy)

5

Spread across the small dish

6

Add the tomato dice

7

Carefully break the eggs into the vegetables, without breaking the yolks

8

Drizzle over the cream and season, taking account of how salty the cheese is likely to be

9

Sprinkle over the breadcrumbs

10

Place the dish on the oven tray for about 8 minutes until the egg is set

11

Watch the egg yolk carefully - hard-boiled is not what we aiming for!

Notes

It easy to increase this to serve more than one person but I'd use individual dishes if you can. Serving could be messy from one large dish.

Autumn/ Lunches & Light Suppers/ Summer/ Suppers, Dinners & Main Courses/ Uncategorized/ Winter

#SUPERMARKETSIESTA 2 AND A HALF

The idea for this blog came when I realised, after leaving my corporate life, how much food I was throwing away, if I had over-provisioned (that happened SO often). It was therefore a stark reminder of my old life when towards the end of last week I was faced with leeks, feta cheese, an astonishingly pretty striped aubergine, a couple of San Marzano tomatoes and the dregs of the carton of creme frâiche. A rummage in the dry goods drawer also revealed a sad, almost empty bag of pearl barley. This post therefore, is not quite episode 3 of Supermarket Siesta which follows later this week, but I felt did talk to the origin of this blog.

The weather had begun to feel more like autumn, although not yet cold enough to trigger my soup-making (although enough to make me feel like Kanga counting Roo’s vests). So what to make? When in doubt, consult Elizabeth David is my motto and after half an hour in her company, and an espresso, I had inspiration, although I have to say I made most of this up as I went along.

So here are two simple recipes that are quick, reasonably priced and can be dressed up and down to suit either a solo lunch or supper at home, or serve as starters or main courses. I have a number of vegetarian friends and these work well for them, although I’m still working with a limited repertoire for vegans. I don’t seem to be able to get past using eggs, cheese and butter; my fault I know and I probably need to find the time to do a whole lot more research.

I think the stuffed aubergines will be a regular through the autumn and winter and I’m looking forward to playing around with the flavours.

Stuffed Aubergines

Print Recipe
Serves: 2 Cooking Time: 30 minutes

Ingredients

  • 2 tbsp olive oil
  • 40g uncooked weight pearl barley
  • 2 large tomatoes, skinned and chopped
  • 1 small shallot, finely chopped
  • 1 clove garlic, finely chopped
  • 2 sprigs thyme, leaves stripped and chopped (I don’t always bother to chop as I don’t mind seeing the little leaves in the finished recipe)
  • 0.25 tsp ground cumin
  • finely grated zest of half a lemon
  • 1 dsp capers, rinsed and chopped
  • 40 - 50 g feta cheese
  • 2 tbsp dried breadcrumbs
  • Salt and freshly milled black pepper
  • A greased oven tray

Instructions

1

Pre heat the oven to 200 degrees C/180 degrees fan

2

Set the pearl barley to cook over a moderate flame until al dente then drain

3

Cut out the flesh of the aubergine, chopping it into 1cm dice. Leave a slim shell of aubergine skin and set aside.

4

I find an old grapefruit knife remarkably useful for this operation. Try your best not to pierce the shell as it will leak horribly.

5

Heat the oil in a thick based pan and soften the shallot and garlic, without letting them colour

6

Add the aubergine flesh and cumin and cook until the aubergine begins to soften

7

Add the tomato, thyme and barley and mix well

8

Allow to simmer until the mixture is quite dry - the tomato juices must evaporate to stop the mixture being sloppy and also to intensify the flavours

9

Add the grated lemon zest and capers and check the seasoning

10

Fill the two aubergine shells, packing the mixture quite firmly

11

Crumble over the feta cheese and finish with the breadcrumbs

12

Cook for 25 - 30 minutes until the stuffing is hot, cheese melting and the aubergine shells a bit wrinkly

Notes

I prefer to eat this warm rather than hot and like it with either a simple green salad or buttered savoy cabbage. Feel free to experiment with the spices here; I can imagine cinnamon being good and to shake things in a different flavour direction, ground cardamom and/or fennel seeds. Just thought - dried porcini mushrooms, soaked and finely chopped could be good too.

Autumn/ Breakfasts & Brunches/ Desserts & Savouries/ Spring/ Summer/ Winter

BANANA EMERGENCY

I had a bit of a challenge to my Watchful principles last weekend, as I discovered three elderly bananas that were quite beyond eating “as is”, and for some reason I had neglected to eat most of the Discovery apples that had been delivered by Farmdrop.com. I can’t really explain that latter event, as I adore those apples and they have such a short season. It might have had something to do with my stuffing myself with a friend’s homegrown raspberries and the delivery, direct from Italy, of the most fragrant melon, another gift from a friend – lucky me!

Anyway, these poor apples had become a tad on the wizened side, so I made Spiced Apples (elsewhere on this site), not thinking they’d also come to the rescue in a banana emergency.

I have a fairly large collection of cookery and food books, together with favourite websites and years and years worth of good, old-fashioned clippings from magazines and newspapers. I wish I could tell you that the latter are in apple pie order and that I can lay my hands on exactly what I want in a trice. Nope. Not a hope. This lamentable lack of organisation came back to haunt me when I wanted to save these poor bananas from the bin and had a vague recollection of a good recipe from some years ago. I will cut a long and frustrating story short, by saying it took me nearly an hour to find what I wanted. Yes, there were other recipes more readily available, but stubbornly, I wanted that particular recipe that turned out to be snipped out of an American newspaper eleven years ago. It probably wouldn’t have taken me an hour if I had remained on task, but I kept discovering long forgotten gems, some of which revealed just how rusty my once fairly fluent French has become. Anyway, back to bananas.

The recipe is straightforward enough, in fact it is so simple it barely counts as cooking. Assuming, of course, one has all the ingredients…..now, I am an incurable recipe tweaker, except when it comes to cakes and baking generally. I don’t seem to have to same instinct for baking as I do for other areas of cookery, so tend to tweak only minor ingredients. I am not sure, however, it counts as minor when I discover I only have slightly more than half the required peeled weight of bananas. At this point I had greased the tin, was heating the oven and had weighed out all the other ingredients so opting out wasn’t an option. And Edoardo was expecting cake…….I sympathise, I get a bit like that when I’m expecting cheese…..

Anyway, for once I decided to tweak on a more major scale and made up the weight by using Spiced Apples that were drained of the juice that is inevitable with them. I did wonder if they would make it a bit too damp but decided to keep a close eye on the cake in the oven. For me, it is a minor miracle that it turned out perfectly: moist, light and full of flavour. I might even make this more often (cue for E’s eyes to light up – he complains he is cake-deprived normally).

I have written up what I did, but I suspect you could tinker around with the proportions, so long as it added up to 225g. And it wouldn’t have to be the Spiced Apple recipe; I might try it with raw grated apple and increase the spice content a bit. If you do try that, please let me know how it works out.

One last note; in the picture I was worried to see what looks like a lump of uncooked cake mixture but was relieved when it turned out to be a piece of apple!

I hope you enjoy this – we now call it “Leftovers Cake” but it’s not a very appetising title!

Spiced Banana and Apple Cake

Print Recipe
Serves: 10 Cooking Time: 45 - 60 minutes

Ingredients

  • butter for greasing the tin
  • 85g unsalted butter
  • 225g plain flour
  • 3 tsp baking powder
  • 0.25 tsp bicarbonate of soda
  • 0.25 tsp salt
  • 0.25 tsp grated nutmeg (or cinnamon, or a mixture of both)
  • 120g peeled weight ripe bananas
  • 105g drained Spiced Apples
  • 110g caster sugar
  • 2 medium eggs, beaten in a cup
  • 100g roughly chopped walnuts
  • 1kg/2lb loaf tin, base and long sides lined and greased with butter

Instructions

1

Pre heat the oven to 190 degrees/170 degrees fan

2

Melt the 85g butter in a small saucepan over a gentle heat (it mustn’t colour) and allow to cool

3

Mash the bananas thoroughly and stir together with the apple

4

Stir in the sugar, eggs and melted butter

5

Sift in the flour, baking powder and bicarb, folding in carefully

6

Fold in the chopped walnuts

7

Turn the mixture into the prepared tin, giving it a smart tap on the work surface to eradicate any air pockets and smooth off the top

8

Bake in the oven for 45 - 60 minutes, testing with a skewer after 45 minutes.

9

This one was done after 50 minutes but I suspect the banana/apple proportion will influence the time

10

Leave to cool in the tin for 10 minutes, then remove form the tin and cool on a wire rack

Autumn/ Lunches & Light Suppers/ Summer/ Suppers, Dinners & Main Courses

#SUPERMARKET SIESTA 2

Last week I started my response to the Supermarket Siesta challenge and I have to say, everything about it talks to my desire to move away from (my) mindless on line ordering or wandering in a supermarket. As I said also last week, I am not going to declare supermarkets instruments of the devil (although I can think of a couple of brands that do approach that status), but I am finding using farmdrop.com and Borough Market (to name but two), does make me plan meals better and think more clearly about the seasonality, balance, flavours and economy of what we’re eating.

Yes, it takes a bit of time a couple of times a week to do that planning but in truth, it’s time I look forward to, as it allows me to think about what’s seasonal and then rummage around, either in my food library (I’m going to write about that soon) or in my head, to find solutions. Sometimes I am beguiled by something so appealing when I’m shopping that I do click or buy and then think afterwards about what I’m going to make! On reflection though, that is exactly what I do when we’re in Italy, so interestingly, I am moving my UK habits closer to those I have in Italy.

Our menu for Sunday looked like this:

Breakfast

Jersey milk yogurt with blueberries
Sourdough toast with blackberry and gin jam

Lunch we had out, so doesn’t count here

Supper

Piedmont peppers (will write this up soon)
Salmon fillet wrapped in Parma ham with bay leaves (ditto!)
Chargrilled golden zucchini with lemon, fennel seed and basil dressing
Spiced apples (recipe elsewhere on this site) with creme fâiche

My bill for this lot from non-supermarket suppliers was £27.20 and the same on-line service that I used last week for comparison came to £34.91. I have not included store cupboard ingredients such as anchovies, fresh basil or garlic as I have those to hand all the time. If it’s not basil season, it will be thyme or rosemary, both of which obligingly supply the kitchen all year round.

The most remarkable price differentials came with the Sourdough bread (£3.20 versus £5.33 weight for weight), two organic red peppers (£2.00 versus £6.00) and the San Marzano tomatoes (£2.70 versus £3.99 by weight). I used lovely farmdrop.com for some items and others came from traders within Borough Market.

Also, I had made enough Piedmont Peppers and Chargrilled Zucchini for us to have them for lunch on Monday with bread and a bit of goat’s cheese.

Chargrilled Golden Zucchini with Lemon, Fennel Seed and Basil Dressing

Print Recipe
Serves: 4 Cooking Time: 30 minutes (ish)

Ingredients

  • 500g golden zucchini, or indeed any fresh looking ones you can get
  • olive oil for brushing
  • 1 clove garlic
  • 100ml extra virgin olive oil
  • freshly squeezed juice of half a large lemon
  • quarter teaspoon of fennel seeds
  • fresh basil leaves

Instructions

1

If the zucchini are quite large, the skins can be a bit tough so just scrape a vegetable peeler down it to give a striped effect

2

Dispose of the stalk and slice into 2 - 3ml thick slices

3

You can either produce “coins” (hence the word “zucchini” in the first place), or on the diagonal, or even lengthways; do what pleases you

4

Brush them with olive oil but don’t soak them

5

Heat a griddle pan until hot but not smoking - you’re dealing with delicate zucchini here, not a chest-beating steak

6

Add a few slices at a time but don’t over-crowd the pan or you’ll start to get too much steam kicking up

7

Once each slice has nice clear stripes, turn them over; for me, they are then done when they have gone floppy and have good chargrilling marks on them

8

Remove to a platter and spoon over the dressing, building up the platter in layers as the zucchini become readyFor the dressing:

9

Crush the garlic with sea salt under the blade of a knife and put into a small bowl

10

Gently crush the fennel seeds, just enough to allow the fragrance to release more easily and add to the bowl

11

Pour in the extra virgin olive oil and whisk briskly

12

Add lemon juice to your taste; I quite like a lemony sharpness to counteract the smoothness of the grilled vegetable and we were having it with salmon which is a rich fish

13

Add freshly milled black pepper to taste

14

Once you have layered and dressed all your zucchini, finish with torn basil and a final flourish of oil

Notes

You can also include aubergines in with this and I do still salt and drain them first. Habit, I suppose, as we are told that modern varieties aren't bitter. Slice them a little thicker, say 3 - 4 ml, and they need a little longer on the griddle, too. Later in the autumn, I add a little ground cumin to the dressing, if I am using aubergine for a warm flavour. Finely chopped chilli also works well here in the dressing.

Autumn/ Suppers, Dinners & Main Courses/ Winter

#SUPERMARKETSIESTA 1

Not the most delicious looking dish perhaps, but I promise you, it is wonderful

No, I wasn’t quite sure what it meant either. But I was invited to an event in the far north of London (OK, it was near Moorgate Station but I live in Wimbledon so anything north of the Marylebone Road induces a nosebleed) that invited me to discover what it was all about.

It was worth the trek as happily, it was a convention of some of my favourite suppliers who were launching a mission to “challenge the UK public to shake up part of their weekly shop – switching from supermarkets to specialists” (taken from their marketing material) for the month of September.

Now, I am already a huge devotee of farmdrop.com who supply the most wonderful fruit & veg, fish, meat, bread & cakes and fresh pasta from small local suppliers, so it was a delight to meet the lovely Lucy and gifted Beth (a semi finalist in Masterchef who now masters the Farmdrop social media content and cooks, too). More about them later, but I was also introduced to pongcheese.co.uk I am afraid to say that Edoardo and I were a little less than restrained with the sampling of their fabulous cheese; we will be ordering from them so I’ll write about that later this month.

Edoardo is already a devotee of HotelChocolat.com so was happy to sample their luxurious chocolate and by luxurious, I don’t necessarily mean expensive – it is the flavours and inspired combinations that denote luxury here. Chocolate is not my weakness so I went back to the cheese zone, via FishforThought.co.uk where I sampled fresh crab – one of my favourites, and nakedwines.com Regrettably I might have sampled there just a tad over-enthusiastically so I needed more cheese to mop it up…..that’s my excuse anyway.

I am also not going to sit here and criticise all supermarkets, but increasingly they are NOT a good place to buy your fresh food. In my view, they place far too much emphasis on visual appeal and how easy it is to pack food. I guess for them, life is easier if all tomatoes or apples or whatever are of a uniform size, making packaging and general logistics more predictable and thus cost-controllable. As shoppers though, we perhaps have to take some of the blame for this obsession with the perfect tomato; a tomato’s perfection should be assessed by its flavour, not the fact that it looks shiny and perfect. The British by and large don’t shop with their noses – how may times have you observed someone in a supermarket sniff a melon to see if it’s ripe? Unless you’ve seen me, I’d say quite rarely. And how can we sniff a tomato if the poor wretched things are imprisoned in a plastic box and wrapped in cellophane? Never mind, they look good so that’s all right then!

I do have some sympathy with supermarkets when the media coverage tends to focus solely on their price competitiveness, so they find themselves in a race to the bottom. And back also to my lament that wanting to have good food, fairly priced is somehow seen as elitist or the province of the chatterati in the UK. No, it isn’t, the less you have to spend on food, the less you can afford to be taken in by supermarkets; the less you have to spend on food, the more you need to be able to cook a few basics like soup, casseroles, anything eggy and bread. And I don’t buy the time objection either, but you do need to be organised and prepared to learn. Rant over…..

Anyway, to go back to the challenge issued by these great producers, Edoardo and I decided to see if we could eat for a whole day using fresh ingredients only from these guys. I planned the menus for Sunday which also prompted me to try an Italian dish I ate once years ago and have wanted to attempt myself ever since. Here’s what we ate last Sunday:

Breakfast

Jersey milk yogurt & blueberries
Cafone sourdough toast with unsalted butter

Lunch
Chargrilled courgettes and aubergine with crumbled feta cheese
Rosemary focaccia

Dinner
Beetroot tortelloni with sage butter and poppy seeds
Loin of pork in milk (recipe later – don’t be deterred by the title, it’s scrumptious)
Boiled potatoes
Chard
Apple tart with creme fraiche (Edoardo had room for this – I didn’t!)

All these came from farmdrop.com and my bill was £37.00 and did several meals: the chargrilled veg, left over pork and potatoes were all upcycled into delicious meals today and the bread will last for several days. The sourdough comes in a huge 800g loaf that goes in the freezer on day three and is perfect for a week or so. The focaccia is so good that I’m afraid that despite the fact it arrives in a monster 400g slab, it doesn’t last more than two days so never sees the freezer!

I have virtually shopped this same list with from a supermarket’s on line shop (no, not saying which one!) and the bill came to £41.77; several ingredients were not available as organic and I couldn’t get Jersey milk yogurt. I also know that the supply chain is far shorter with Farmdrop and the producer gets a fairer cut of the money, which matters hugely to me. I shop mainly organic because I have concerns about animal welfare and again, I know with Farmdrop, I can be easier in my mind about that.

We both also said that the quality of the food was considerably better, so we are going to continue using Farmdrop.com and before anyone asks, no, I receive no remuneration or other consideration from them – I just want good food, honestly priced and sourced and they hit the spot.

So, on to the recipe with this blog. Loin of pork in milk sounds hideous but please trust me when I say it is absolutely scrumptious. If you like a deeply savoury, umami flavour then this is the dish for you. The milk renders down into a dark, double cream that is glossy and chestnut coloured; the meat becomes tender and can be cut with a spoon. It is simple but does need an eye kept on it, so best to cook it when you can be near the kitchen every 20 – 30 minutes. It is also very rich, so I recommend keeping the accompaniments very simple; plain rice or potato and a leafy green vegetable go well. Please, buy the best quality pork you can find; something sitting on a blue polystyrene tray in a chiller cabinet won’t cut it. It is easier to carve if you buy a boned, rolled loin but I do prefer the extra flavour that is there when the bone is present. It’s not that much harder to carve if you loosen the meat away from the bone first and of course, use a surgically sharp knife! This recipe also calls for the joint to be skinless and this is also easy to do with the properly sharp knife. Just cut the string, slice off the rind as close to the skin as possible and roll and tie it up again. I keep the rind in the freezer to add to beef casseroles later in the winter for extra depth of flavour.

Loin of Pork in Milk

Print Recipe
Serves: 4 Cooking Time: 2 hours

Ingredients

  • 1kg loin of skinless free range organic pork
  • 2 tbsp mild olive oil
  • 25g butter
  • 550ml whole organic milk (please don’t try this with semi- or skimmed milk, it won’t work)
  • bay leaf
  • sprig of thyme or rosemary
  • salt and freshly milled black pepper

Instructions

1

Use a thick based casserole or stout pan, just large enough to hold the meat

2

Heat the butter and oil until the foaming point is subsiding and then add the meat, initially fat side down

3

Brown all sides of the meat and turn down the heat if the butter becomes dark brown or if it smells too nutty

4

Season and gently add the milk - I usually take the pan off the heat momentarily to do this and avoid sudden eruptions - followed by the bay leaf and your choice of herb

5

Allow the milk to slowly come to the boil and then turn the heat own to a gentle simmer

6

Put on the lid, slightly askew and simmer for about 2 hours

7

Every 30 minutes or so, turn the meat and in the meantime, keep an eye or ear out for overboiling

8

You might need to add a little more milk

9

After about the first hour, the milk will start to change colour and also create little clusters that will gradually also go a golden brown - don’t worry, it’s not curdling

10

Once you can easily pierce the meat with a fork, remove it to a carving board or dish and cover with foil to keep warm

11

While this is happening, draw off the surface fat from the milk mixture but do be careful not to rob yourself of any delicious nutty clusters

12

Stir quite vigorously and if you prefer to thin it a little, add a couple of tablespoons of warm water; ensure you loosen all the scrummy bits adhering to the base of the pan

13

Discard the bay leaf and herbs

14

Cut the string on the meat and slice into medium thick slices, arrange on a platter and pour over the sauce

Notes

As I’ve said, you might want to keep accompaniments simple and any first course could be vegetable based, for example Piedmont peppers or chargrilled courgettes with basil. Having said that, last Sunday we preceded it with a small portion of pasta, so anything non meat based can work.